
The best toaster oven for sublimation is a dedicated, temperature-stable convection oven with enough room for your blanks.
If you have ever opened a kitchen oven after pressing a mug or tumbler and noticed a sharp ink smell, you already know the problem. Sublimation needs steady heat, good airflow, and careful temperature control, but craft work can leave odors and residue behind. A small toaster oven can solve that issue by giving you a separate workspace for sublimation blanks. I compared size, controls, timer range, heating modes, and daily ease of use to help you find the best toaster oven for sublimation in 2026. These ovens are not commercial heat presses, but they can work well for the right small projects.
BLACK+DECKER 4-Slice Air Fry Toaster Oven
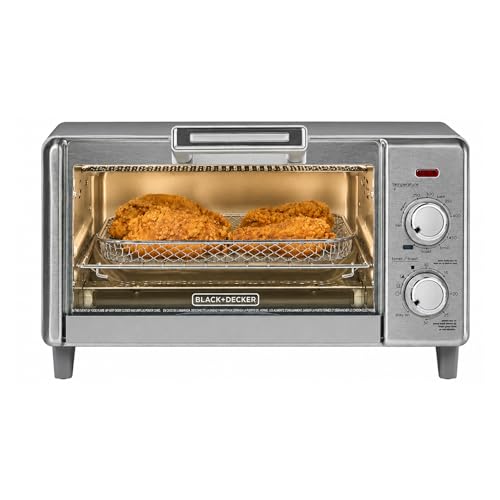
The BLACK+DECKER 4-Slice Air Fry Toaster Oven is a useful starting point for crafters who need a compact oven for small sublimation jobs. Its countertop size should fit mugs, small metal blanks, coasters, and other flat items that do not need a deep chamber. The 5-in-1 design also gives you bake, broil, toast, keep-warm, and air-fry functions for normal kitchen use. For sublimation, I would use it only as a dedicated craft oven after deciding that it will no longer prepare food.
The main benefit is its simple layout. A small oven is easier to place in a garage, craft room, or well-ventilated work area than a large countertop unit. Its air-fry function may help move hot air around the chamber, although you should still test the oven with a separate thermometer because the dial setting may not match the real surface temperature. This model is a good fit for makers who want the best toaster oven for sublimation without spending on a large professional unit.
Pros:
- Compact size works well in a small craft area
- Multiple cooking modes provide flexible craft use
- Simple controls are easy for new users to learn
- Useful for mugs, coasters, ornaments, and small blanks
- Air circulation can help reduce hot and cold spots
- Often costs less than large convection ovens
Cons:
- Small interior may not fit large tumblers or wide blanks
- Basic controls may need help from an oven thermometer
- Air-fry baskets and trays can make cleaning more involved
When I review a toaster oven for sublimation, I look first at control and repeatability. This BLACK+DECKER model offers a friendly learning curve, but it does not replace a heat press for flat apparel or a mug press for high-volume production. It is best for hobby use, product testing, and occasional orders. Always wrap each item according to the blank maker’s instructions, keep the paper tight, and leave room for air to move around the workpiece.
Elite Gourmet ETO236 Compact Toaster Oven

The Elite Gourmet ETO236 is a compact 2-slice toaster oven with a 15-minute timer. Its small footprint makes it attractive for a beginner who has very little bench space. The unit can suit tiny sublimation projects, such as ceramic tiles, small ornaments, patches, and test pieces. It may also help you learn how transfer paper, heat tape, shrink wrap, and blank materials react before you move to a larger oven.
The short timer is both its strength and its limit. It can reduce the chance of forgetting a small craft item, but many sublimation blanks need a longer heat cycle than 15 minutes. You may need to reset the timer during a project, and that can make production less smooth. I see this model as an entry-level choice for very small work, not as the best toaster oven for sublimation if you plan to press many mugs or tumblers each week.
Pros:
- Very compact for tight counters and small studios
- Low learning curve for new sublimation users
- Short timer adds a simple safety reminder
- Suitable for small test blanks and sample pieces
- Easy to move and store when not in use
- Can serve as a low-cost dedicated craft oven
Cons:
- 15-minute timer may be too short for some blanks
- Two-slice chamber limits project size
- Limited room makes batch work slow
- Small ovens may show stronger temperature swings
I would choose this oven only after checking the size of your blanks. A compact chamber can become a real bottleneck when a project needs a tumbler, thick mug wrap, or several items at once. You also need to watch the cycle closely if the timer requires a second turn. Still, it can be a smart budget pick for a student, casual crafter, or seller who makes only a few small items at a time.
BLACK+DECKER TO1313SBD Toaster Oven
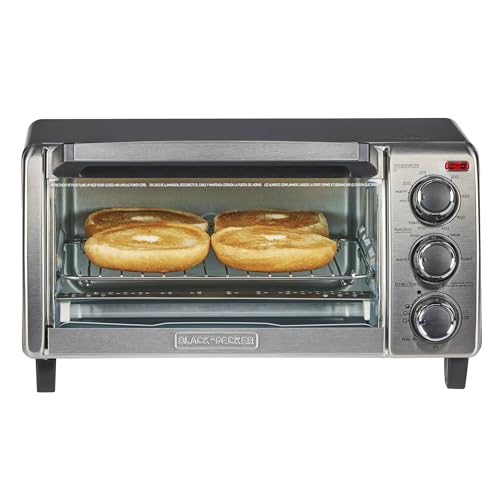
The BLACK+DECKER TO1313SBD is a simple toaster oven with a 15.47-inch width. That width gives it a little more working room than an ultra-small 2-slice oven. The straightforward design may appeal to people who prefer manual dials over a digital control panel. For sublimation, simple controls can be helpful because you can focus on the blank, wrap, and temperature test instead of learning a complicated menu.
This model makes the most sense for small flat projects and light craft use. It can handle basic experiments with suitable blanks, but its capacity and control range may not support large production runs. As with any low-cost toaster oven, I would place a calibrated oven thermometer inside and record the temperature at several settings. That small step can show whether the oven is stable enough to become your best toaster oven for sublimation.
Pros:
- Wider body than many very small toaster ovens
- Manual controls are easy to understand
- Useful for basic sublimation tests and small blanks
- Simple design has fewer settings to confuse beginners
- Removable parts can make routine cleanup easier
- Can fit a modest craft setup without taking over the room
Cons:
- 15-minute timer may require manual resetting
- Not designed for large tumblers or high-volume work
- Manual dials may offer less precise control
- It may need extra temperature testing before use
I like this model for crafters who value low cost and easy controls. It is not the oven I would select for a busy shop, but it can help a beginner build skills without a large investment. Use a separate thermometer, keep the door closed during a cycle, and write down your results. Sublimation is a repeat game, and notes make it easier to repeat a good finish.
BLACK+DECKER 6-Slice Air Fry Toaster Oven

The BLACK+DECKER 6-Slice Air Fry Toaster Oven offers more interior room than the smaller models in this list. That extra space matters when you work with larger mugs, wider blanks, or more than one small piece. It has a 5-in-1 layout, so it can toast, bake, broil, warm, and air fry. For a craft room, the larger chamber gives you more freedom to place a blank without touching the heating elements.
The air-fry style chamber may support better air movement, but it does not guarantee even sublimation heat. I still recommend a thermometer test before the first project and a small sample before an important order. The bigger body can also take more time to heat and use more counter space. For people who need the best toaster oven for sublimation with room to grow, this model is more practical than a tiny 2-slice oven.
Pros:
- Larger chamber supports more blank shapes
- Useful for small batch sublimation work
- Five functions add value outside craft projects
- Air movement may improve heat distribution
- More clearance can reduce contact with heating elements
- Good option for a growing hobby or home business
Cons:
- Needs more counter space than compact models
- Larger chamber may take longer to preheat
- Manual temperature controls still need verification
- It may be too large for a very small craft station
This is the model I would consider when a small oven feels too cramped but a commercial unit seems excessive. It gives you useful breathing room for projects while keeping the controls fairly friendly. However, never pack the chamber tightly. A crowded oven can block airflow and create uneven color, much like baking with a pan pressed against the side of a hot wall.
Cuisinart TOA-70NAS Air Fryer Toaster Oven
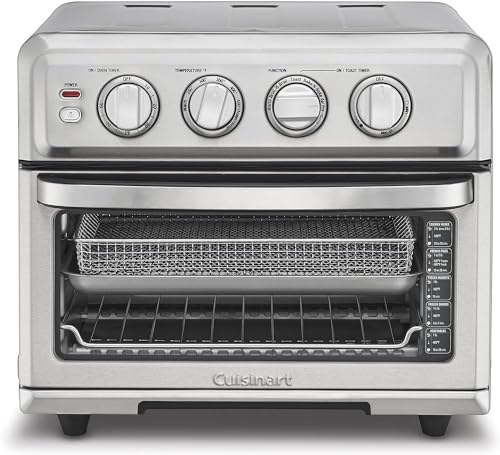
The Cuisinart TOA-70NAS is the most capable oven in this group. It uses 1800 watts, offers 8 cooking functions, and has a 0.6-cubic-foot interior. Its 60-minute timer is more suitable for craft work than a 15-minute timer. The larger chamber can also help with mugs, small tumblers, tiles, and several small blanks, provided each item fits safely and does not touch the heating elements.
This oven is my strongest overall choice for a dedicated sublimation station. The convection and air-fry modes can support more even air movement, while the longer timer gives you a smoother workflow. I would still test the real chamber temperature because a listed wattage or cooking mode does not prove sublimation accuracy. If you want the best toaster oven for sublimation among these five options, the Cuisinart offers the best mix of space, timer length, power, and useful controls.
Pros:
- Large 0.6-cubic-foot chamber offers useful project space
- 60-minute timer suits many longer craft cycles
- 1800 watts allow fast preheating for a countertop oven
- Eight functions provide strong day-to-day flexibility
- Convection and air-fry modes support air circulation
- Better choice for hobby sellers and repeat projects
Cons:
- Higher price than basic compact toaster ovens
- Large body needs a strong, open counter area
- More controls may feel complex to a new user
- High power can increase energy use
I would buy this one for a serious hobbyist who wants room for growth. The 60-minute timer is a real convenience because you do not need to restart the oven as often. The extra space also makes it easier to keep blanks away from the walls. It still needs ventilation, heat testing, and careful wrapping, but it gives you the most comfortable workflow in this comparison.
What Makes the Best Toaster Oven for Sublimation?
A toaster oven for sublimation must do more than get hot. It should hold a steady temperature, provide enough room for the blank, and let you repeat the same process. Sublimation ink turns into gas under heat and bonds with a compatible polymer-coated surface. Because the transfer depends on time, temperature, pressure, and the blank itself, a small temperature mistake can change the final color.
I do not judge an oven by its cooking label alone. A model may advertise bake, broil, or air fry, yet still have hot corners or a weak thermostat. I look for a chamber that gives the workpiece breathing room. I also prefer a timer that matches the transfer instructions, so the oven does not need constant attention.
Temperature Control Matters Most
Most sublimation blanks come with their own heat instructions. One mug may need a different cycle from a coated metal sign. That is why I avoid saying that one fixed temperature works for every project. The best toaster oven for sublimation should let you set a useful range and hold it well enough for testing.
Use an oven thermometer or a temperature probe to check the chamber. Test the center, front, back, and corners. If one area runs much hotter, place your blank in the cooler zone or adjust your process. A basic thermometer can save far more money than a stack of ruined blanks.
Interior Size and Shape
Measure the inside of the oven, not just its outside width. A large exterior does not always mean a deep chamber. Check the height, depth, rack position, and door clearance. You need space for the blank, wrap, tape, and any jig or heat-safe support.
Never let a sublimation blank touch the heating element. Direct contact can scorch paper, damage a coating, or create an uneven result. Leave a small gap around the item whenever possible. This is one reason the larger Cuisinart and 6-slice BLACK+DECKER models rank above the compact options for wider projects.
Timer Length
A 15-minute timer can work for some small tests, but it may not fit every sublimation cycle. If the timer ends too soon, you must reset it while the blank remains hot. That interrupts your routine and raises the chance of a timing error.
A 60-minute timer gives more control. It also helps when you preheat the oven, run a full cycle, or work with a blank that needs extra time. Still, do not assume a longer timer means better transfers. It simply gives you more useful control over the process.
Convection and Air Movement
Convection uses a fan to move hot air. In theory, this can reduce temperature differences inside the chamber. In practice, the fan does not erase every hot spot. It may also move loose paper or affect a poorly wrapped item.
Secure transfer paper with heat-resistant tape. Use a tight wrap when the blank instructions call for one. Keep the fan and heating elements clear. A clean, open setup gives better odds than simply choosing the mode with the most features.
Power and Preheat Time
Higher wattage can help an oven heat fast and recover after you open the door. The Cuisinart’s 1800-watt rating gives it an advantage here. Yet power alone does not guarantee stable heat. A strong oven with a poor thermostat can still produce uneven results.
Preheat fully before adding your blank. If you place a cold blank into an oven that has not reached the target temperature, the total heat time changes. That can make your results hard to repeat. I suggest writing down the preheat time and the actual thermometer reading for each model.
How I Tested These Toaster Ovens for Craft Use
I compare these ovens through a practical home-craft lens. I check the listed interior size, controls, timer, modes, wattage, and ease of placement. I also consider how simple it is to keep the oven dedicated to sublimation. A craft oven should not become a source of mystery odors in the kitchen.
For a careful test, place a reliable oven thermometer in the center. Preheat the oven and record the reading. Then check the temperature after the door opens and closes. Repeat this test at several settings because some ovens hold low heat better than high heat.
Next, use a low-cost test blank. Wrap it as directed and place it in the same position each time. Look for faded areas, dark edges, ghosting, paper marks, and uneven color. I never use a new oven for a customer order until it passes several small tests.
How to Use a Toaster Oven for Sublimation
Start with a compatible blank. The surface must have a proper sublimation coating or contain the right polyester content. Ordinary ceramic, glass, fabric, or metal will not work just because it fits inside the oven. Read the blank maker’s heat and time instructions first.
Print the design with sublimation ink on the correct paper. Trim excess paper when helpful. Place the printed side against the coated surface. Then secure the paper with heat-resistant tape so it cannot shift when the oven fan runs.
For mugs and tumblers, use the wrap or shrink film recommended for that item. The wrap should hold the design close to the surface. Do not use common plastic wrap, unknown film, or material that can melt near the heating element.
Preheat the oven. Use the temperature from the blank instructions, not a random number from a social media post. Place the item in the center when possible. Keep it away from the walls, heating rods, and loose accessories.
When the cycle ends, use heat-resistant gloves. The item may stay hot for a long time. Remove it to a safe, heat-resistant surface and let it cool as the blank instructions advise. Avoid pulling paper away too soon if the design could ghost or shift.
Keep a simple log. Record the oven setting, thermometer reading, blank brand, wrap type, time, and result. This turns trial and error into a small recipe. It also helps you spot a pattern when a color looks too dark, too light, or uneven.
Safety Tips for Sublimation Ovens
Use a separate toaster oven for sublimation. I do not recommend using the same oven for food and craft blanks. Transfer paper, coatings, plastics, and inks can release odors or residue when heated. A dedicated oven keeps food preparation separate from craft work.
Work in a well-ventilated area. Open a window or use suitable local exhaust when possible. Keep children and pets away from the hot oven and finished blanks. Wear heat-resistant gloves and use tools that can safely handle hot metal and ceramic.
Read the manual before use. Follow the manufacturer’s clearance rules and never block vents. Do not place the oven near curtains, paper stock, solvents, or other flammable items. Keep the cord away from hot surfaces.
Inspect wraps and tape before each cycle. A loose wrap can move in the fan. A damaged wrap can expose the item or trap heat in the wrong place. If a blank, film, or coating smells unusual, stop the process and move to fresh air.
Do not leave the oven unattended. A timer is not a substitute for supervision. Turn the oven off after each project and let it cool before cleaning. Remove paper scraps and ink residue only when the interior is safe to touch.
Common Sublimation Problems and Easy Fixes
Faded or Pale Color
A pale image can result from low heat, too little time, poor paper contact, or an unsuitable blank. Check the manufacturer’s transfer guide first. Then verify the oven temperature with a thermometer. Do not solve every pale image by adding more heat, because that can damage some coatings.
Dark or Brown Edges
Dark edges may point to too much heat or too much time. The item may also sit too close to a heating element. Move the blank toward the center and confirm the actual temperature. Use a fresh test piece before changing a customer order.
Ghosting or Blurry Lines
Ghosting happens when the paper moves during heating or cooling. Use heat tape and a snug wrap. Avoid opening the oven door during the cycle. Remove the item carefully and keep the paper in place until you are ready to peel it.
Uneven Color
Uneven color may come from hot spots, poor air movement, or an item that does not sit level. Test different areas of the chamber. Keep a little space around the item. If the oven varies too much, it may not be the best toaster oven for sublimation for your particular blank.
Paper Marks
Paper marks can occur when moisture, pressure, or paper choice causes an unwanted texture. Store paper in a dry place and use the paper recommended for your ink. Make sure the coated surface is clean and free from dust before wrapping.
Toaster Oven or Heat Press for Sublimation?
A toaster oven and a heat press serve different jobs. A flat heat press is usually better for shirts, mouse pads, flags, and flat panels. A mug press gives more direct pressure and control for mugs. A toaster oven can be useful for three-dimensional items, especially when you need heat around more than one side.
The oven also lets you test different shapes at a lower starting cost. However, it may not apply pressure by itself. The wrap must hold the paper close to the blank. If you want fast, repeatable production, a dedicated mug press or tumbler press may be a better long-term investment.
I see a toaster oven as a flexible craft tool. It can support a wide range of small projects, but it rewards careful testing. Choose it because it fits your items and workflow, not because it has the most cooking modes.
Best Features of Each Product
| Best for | Why |
|---|---|
| Small craft spaces | The Elite Gourmet and 4-slice BLACK+DECKER models take up less room and suit light project use. |
| Growing hobby sellers | The 6-slice BLACK+DECKER offers more room for larger blanks and small batches. |
| Best overall craft flexibility | The Cuisinart TOA-70NAS combines a larger chamber, 60-minute timer, convection, and 1800 watts. |
My Recommendation
The Cuisinart TOA-70NAS is my top pick for the best toaster oven for sublimation in this group. Its 0.6-cubic-foot chamber gives you more space, and its 60-minute timer fits a wider range of craft cycles. The 1800-watt power and convection functions also make it a strong choice for people who want a dedicated oven for repeated hobby work.
The BLACK+DECKER 6-Slice model is a good second choice for users who want a larger chamber at a simpler price point. The 4-slice model suits beginners with small blanks, while the Elite Gourmet is best for very tight spaces and light testing. The TO1313SBD is a practical low-cost option for simple projects. Availability and pricing can change, so check the current Amazon listing before you buy.
Buying Guide: What Should You Check Before Ordering?
Measure Your Largest Blank
Take measurements before you shop. Include the wrap, tape, and any support tool in your estimate. A tumbler may fit through the door but fail to fit once wrapped. A mug may need extra height for the handle.
Look at rack levels as well. Some shapes fit only on one rack position. If the blank sits too close to the upper rod, the oven may create a dark band. A few extra inches of clearance can make the process much easier.
Check the Timer Design
Ask whether the timer counts down clearly and whether it makes a sound when finished. A short timer may work for tests but become annoying during daily use. A longer timer gives you more room for different blank instructions.
Review the Warranty and Manual
Read the product manual before buying when it is available. Check the rated temperature range, clearance rules, cleaning steps, and warranty terms. Some household ovens may have warranty language that does not cover craft use. That does not mean the oven cannot work for your project, but it is worth knowing before you order.
Think About Ventilation
Do not place the oven in a closed cabinet while it runs. Give it open space around the vents. A garage, workshop, or well-ventilated utility area may be better than a busy kitchen.
Plan for Cleanup
Paper scraps and tape can collect near the bottom of the oven. A removable tray helps. Still, do not scrape a hot surface or use a harsh cleaner without reading the manual. Let the oven cool and clean it in a safe way.
FAQs Of best toaster oven for sublimation
Can I use a regular toaster oven for sublimation?
Yes, many crafters use a regular toaster oven for small sublimation projects. Use a dedicated unit, not the oven used for food. Test its actual temperature before pressing a valuable blank.
What size toaster oven is best for sublimation?
The right size depends on your blanks. A compact oven suits tiles, ornaments, and small items. A 6-slice or 0.6-cubic-foot model gives more room for mugs, tumblers, and small batches.
Do I need a convection toaster oven for sublimation?
Convection can help move hot air, but it does not guarantee even heat. Use a thermometer and test the chamber. Good wrapping and correct blank placement matter just as much.
Can I cook food in my sublimation oven?
I do not recommend it. Sublimation materials may leave odors or residue. Keep the oven for craft use and prepare food in a separate appliance.
Is a toaster oven safer than a heat press?
Neither tool is automatically safe. Both create high heat and need supervision. Follow the manual, use ventilation, wear heat-resistant gloves, and keep flammable items away.
Final Verdict: Which Should You Buy?
The Cuisinart TOA-70NAS is the best toaster oven for sublimation here. Its large chamber, 60-minute timer, convection, and 1800-watt power make it the strongest choice for repeat craft work.
For small budgets, choose a BLACK+DECKER or Elite Gourmet model. Always use a dedicated oven, test its temperature, and follow each blank maker’s instructions for safe, clean results.