
Use a stone knife sharpener by soaking or oiling the stone, setting the blade angle, and making steady strokes.
Learning how to use a stone knife sharpener can give your kitchen knives a clean, sharp edge without costly equipment. A whetstone rewards patience: with the right grit, light pressure, and a steady angle, you can restore a dull blade and keep it working for years. This guide explains the process in simple steps, including common mistakes, safety tips, and care for different sharpening stones.
What Is a Stone Knife Sharpener?
A stone knife sharpener is a solid abrasive block used to sharpen and refine a knife edge. Many people call it a whetstone, although “whet” means to sharpen and does not always mean the stone must be wet.
The stone removes a small amount of metal from the blade. When you move the knife across its surface, the abrasive particles reshape the edge into a finer point.
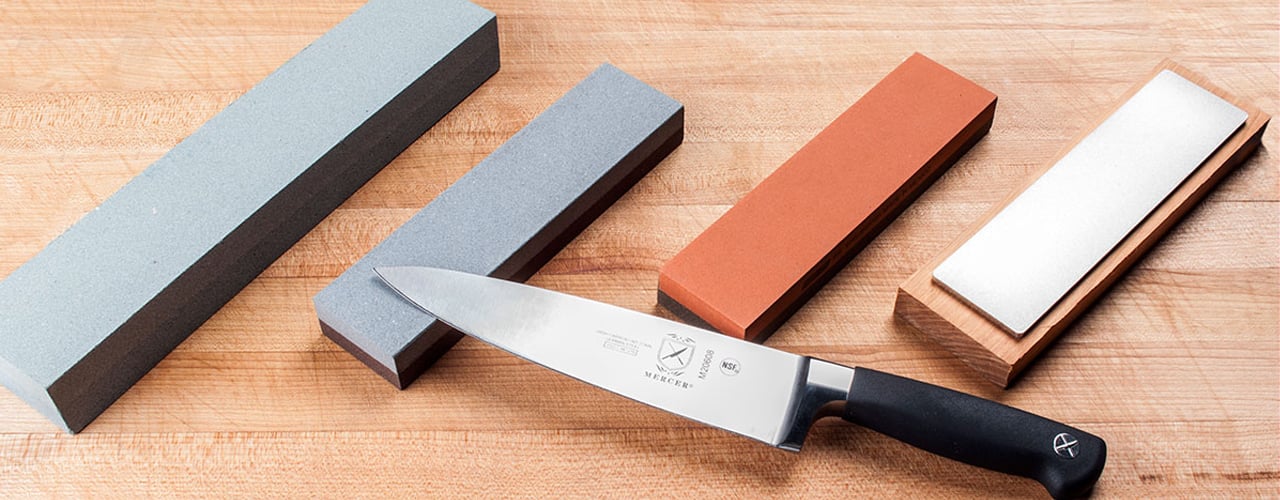
Common stone types include:
• Water stones, which usually need soaking or surface wetting before use
• Oil stones, which use honing oil to carry away metal particles
• Ceramic stones, which are often used dry or with a small amount of water
• Diamond stones, which have a diamond-coated surface and usually work dry
A stone knife sharpener often gives more control than a pull-through sharpener. However, it also requires better technique. Think of the process as guiding a pencil across paper. A smooth, steady motion works better than pressing hard.
What You Need Before Sharpening
Before you learn how to use a stone knife sharpener, prepare a stable work area. A moving stone or wet countertop can cause slips and cuts.
Gather these items:
• A sharpening stone with a suitable grit
• A knife that needs sharpening
• Water or honing oil, based on the stone type
• A non-slip base, damp towel, or stone holder
• A clean cloth
• A bowl or container for water if you use a water stone
• A cutting board or sheet of paper for testing the edge
Choose a coarse stone, such as 200 to 600 grit, for a very dull or damaged knife. A medium stone, around 800 to 2,000 grit, works well for regular sharpening. A fine stone, from about 3,000 to 8,000 grit, polishes the edge.
A beginner often needs only a combination stone with a medium side and a fine side. Very high grits can make an edge smooth, but they do not replace proper sharpening on a coarser surface.
How to Prepare a Sharpening Stone
Stone preparation depends on the material. Always check the maker’s instructions first. Using the wrong lubricant can clog or damage the stone.
Preparing a water stone
Place the stone in clean water if the instructions call for soaking. Many traditional water stones need several minutes of soaking, while some modern stones only need water on the surface.
Small bubbles may rise from the stone during soaking. This often means air is leaving the pores. Do not soak a splash-and-go stone for a long time unless the instructions allow it.
Set the wet stone on a non-slip base. Keep a small cup of water nearby so you can refresh the surface as you work.
Preparing an oil stone
Apply a thin layer of honing oil across the surface. The oil helps carry away loose metal and prevents the stone from becoming clogged.
Do not use water on an oil stone unless the manufacturer specifically says it is safe. Mixing lubricants can reduce performance and make cleanup harder.
Preparing a ceramic or diamond stone
Many ceramic and diamond stones work dry. Some allow a light mist of water. Avoid soaking them unless the instructions clearly recommend it.
A dry stone is convenient, but it can produce more fine dust or metal residue. Wipe the surface when needed and keep your work area clean.
:max_bytes(150000):strip_icc()/how-to-sharpen-knife-with-whetstone-995817_FINAL-5c3facdec9e77c00019976bf.png)
How to Use a Stone Knife Sharpener Step by Step
The best way to use a stone knife sharpener is to focus on four things: the angle, the pressure, the stroke, and the edge.
1. Secure the stone
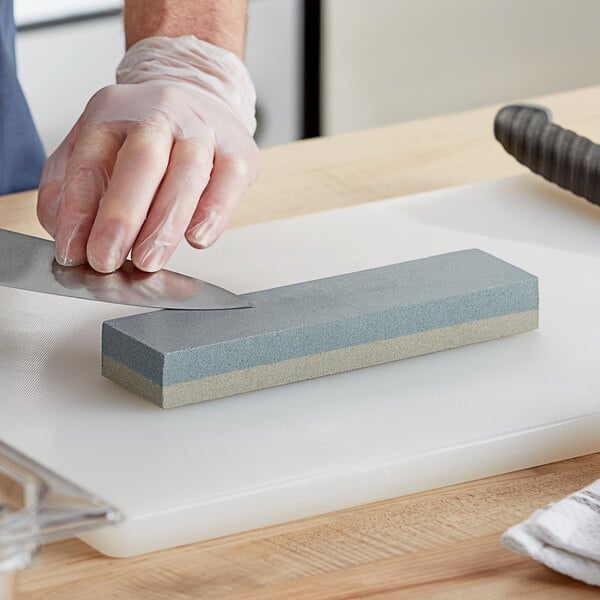
Place the stone on a firm, level surface. Put a damp towel under it if you do not have a stone holder.
The stone should not slide while you sharpen. A loose stone can change the blade angle and increase the risk of injury.
2. Find the correct angle
Most kitchen knives work well at about 15 to 20 degrees per side. Thin Japanese-style knives may use a smaller angle, while sturdy outdoor or utility knives may use a wider angle.
If you are unsure, start near 17 degrees per side. The exact number matters less than keeping the angle steady.
You can estimate the angle by placing the spine of the knife about two to three blade widths above the stone. A small angle guide can help beginners build muscle memory.
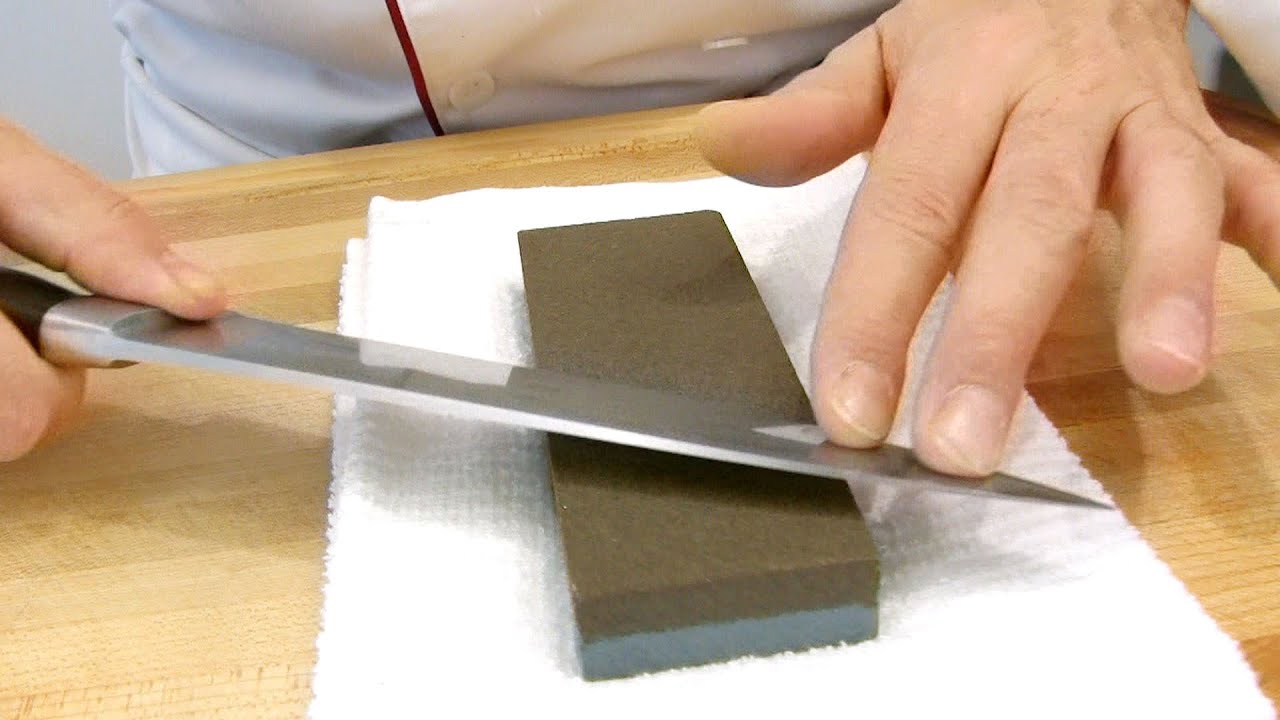
3. Place the heel on the stone
Hold the knife with your dominant hand. Place the heel of the blade near the lower end of the stone.
Keep your fingers behind the cutting edge. Place the fingers of your other hand gently on the flat part of the blade, not over the edge.
4. Move the blade across the stone
Push the knife forward and across the stone as if you were trying to slice a thin layer from its surface. Move from the heel toward the tip so each part of the edge contacts the stone.
Use a smooth stroke. Do not scrub back and forth with short, rough movements.
Lift the handle slightly as you reach the tip. This helps the curved tip follow the stone instead of staying flat and missing the final section.
5. Repeat on both sides
Make several strokes on one side, then repeat the same number on the other side. You can also alternate sides after every stroke once you become comfortable.
Light pressure is usually enough. Pressing too hard can dig the edge into the stone, create an uneven bevel, and remove more metal than necessary.
6. Look for a burr
A burr is a tiny strip of metal that folds over the edge. You may feel it by carefully moving a fingertip from the spine toward the edge, never along the edge.
Work slowly. A burr should form along most of the sharpened side before you move to the next side or finer grit.
Do not chase a burr with excessive pressure. If it forms only in one area, your angle or stroke may not be consistent.
7. Refine the edge
After both sides have been sharpened, use lighter strokes. Alternate sides to reduce the burr.
If you have a fine stone, apply a small amount of the correct lubricant and repeat the process with less pressure. The fine stone polishes the edge rather than reshaping a badly dull one.
8. Clean and test the knife
Rinse or wipe the blade to remove abrasive particles. Dry it fully, especially near the handle and bolster.
Test the knife on paper, a tomato, or a soft vegetable. A sharp knife should cut with little pressure. Never test sharpness by running a finger along the edge.

How to Maintain the Correct Sharpening Angle
Angle control is the hardest part for many beginners. A knife can feel sharp in one area and dull in another when the angle changes during each stroke.
Use these methods to improve control:
• Keep your wrist firm and move your arm from the shoulder or elbow
• Watch the bevel as it touches the stone
• Use slow strokes until the motion feels natural
• Count your strokes on each side
• Use an angle guide during your first few sessions
• Raise the handle slightly when sharpening the curved tip
A useful practice method is to color the bevel with a washable marker. Make a few strokes on the stone, then inspect the ink. If the stone removes ink at the very edge, your angle is close. If it removes ink only near the shoulder, adjust the blade angle.
The goal is not to hold a perfect angle to the decimal point. The goal is to create a clean, even bevel on both sides.
:max_bytes(150000):strip_icc()/faw-product-king-whetstone-starter-set-1000-6000-nsimpson-4110-c9eb3efbdbed469693a44e3baedb3d2f.jpeg)
Choosing the Right Grit
Grit describes how coarse or fine the abrasive surface is. Lower numbers remove metal faster, while higher numbers produce a smoother finish.
Coarse grit
Coarse stones are useful for:
• Repairing chips
• Restoring very dull knives
• Changing an edge angle
• Removing a damaged section
A coarse stone can remove metal quickly. Use it only when needed, because unnecessary grinding shortens the useful life of the blade.
Medium grit
Medium grit is the best starting point for many home cooks. It can restore a dull edge without being overly aggressive.
For everyday kitchen knives, a stone around 800 to 2,000 grit often provides a practical balance between cutting power and smoothness.
Fine grit
Fine stones refine and polish an already sharp edge. They are useful for delicate slicing and for reducing the rough feel left by a coarser stone.
A fine stone cannot fix a badly dull edge quickly. Start with the grit that matches the knife’s condition, then move finer if needed.
:max_bytes(150000):strip_icc()/__opt__aboutcom__coeus__resources__content_migration__serious_eats__seriouseats.com__images__20100423-sharpening20-2004-aba6e6fa129844a7a106fa006eb98c3d.jpg)
Water Stone, Oil Stone, or Diamond Stone?
Each stone has benefits and limits. The best choice depends on your knives, patience, and maintenance habits.
Water stones
Water stones cut quickly and offer excellent feedback. They are popular because they create a fine edge and are easy to clean with water.
Their main limitation is wear. Soft water stones can develop a hollow area in the middle. You may need to flatten them from time to time.
Oil stones
Oil stones are durable and often require less flattening. They can be a good choice for people who want a traditional sharpening setup.
They usually cut more slowly than water stones. Oil cleanup can also be less convenient in a busy kitchen.
Diamond stones
Diamond stones are fast, hard, and usually easy to store. They are useful for hard steels and for flattening other stones.
Use gentle pressure. Heavy force may damage the diamond surface or remove too much metal.
Ceramic stones
Ceramic stones can produce a smooth edge and often need little preparation. They are usually less messy than oil stones.
They may feel less forgiving to beginners because the surface can be hard and less abrasive than a coarse water stone.
Common Mistakes to Avoid
Many sharpening problems come from small technique errors. Fixing these issues can improve results faster than buying a more expensive stone.
• Using the wrong lubricant: Water, oil, and dry use are not interchangeable for every stone.
• Pressing too hard: Heavy pressure can create a rough, uneven edge.
• Changing the angle: An inconsistent angle creates a rounded or uneven bevel.
• Ignoring the knife tip: The curved tip needs a slight handle lift as it crosses the stone.
• Sharpening only one side: Most double-bevel knives need work on both sides.
• Using a loose stone: Movement makes accurate sharpening difficult and unsafe.
• Skipping the burr: Without checking for a burr, you may stop before the edge is fully shaped.
• Using a fine stone first: Fine grit polishes but does not quickly repair a very dull knife.
• Letting the stone dry: Some water stones need a wet surface to cut correctly.
A common beginner mistake is using speed to compensate for poor control. Slow strokes may feel less productive, but they help create a more even edge.

How Often Should You Sharpen a Knife?
The right schedule depends on how often you cook, what you cut, and how you store the knife. A home cook may need stone sharpening every few months, while someone who cooks daily may need it more often.
Honing and sharpening are different. Honing realigns a slightly bent edge, while sharpening removes metal to create a new edge. A honing rod cannot repair a severely dull or damaged knife.
Sharpen the knife when it begins to crush food, slips on tomato skin, or needs more force than usual. Do not wait until the blade becomes dangerously dull. A dull knife often requires more pressure, which can make slips more likely.
Use a cutting board made from wood or soft plastic. Avoid glass, stone, and ceramic boards because they can damage the edge quickly.

How to Clean and Store a Sharpening Stone
Good stone care helps it work evenly and last longer.
After sharpening, rinse water stones and wipe away metal residue. Oil stones may need a suitable cleaner to remove old oil and swarf, which is the fine metal dust created during sharpening.
Allow a water stone to dry fully in a ventilated place before storing it. Do not place a damp stone in a sealed container, as trapped moisture can encourage odors or damage.
Flatten a water stone when the center becomes hollow. You can use a flattening plate or another method approved for that stone. An uneven stone makes it hard to keep a consistent blade angle.
Store the stone where it will not fall or freeze. Water trapped inside some stones can expand in freezing temperatures and cause cracks.
Safety Tips for Using a Stone Knife Sharpener
Knife sharpening is safe when you control the blade and keep the work area stable. It becomes risky when the stone slides or the fingers move near the edge.
Follow these basic rules:
• Keep the cutting edge pointed away from your body
• Hold the knife by the handle
• Keep your support hand behind the blade edge
• Use light, controlled pressure
• Work on a stable counter at a comfortable height
• Wipe up water and oil spills quickly
• Keep children and pets away from the work area
• Clean the blade before using it for food
• Do not rush to finish the last few strokes
Wear cut-resistant gloves only if they do not interfere with your grip. Gloves are not a substitute for safe technique, and loose fabric can create its own hazard.
If a knife has a major chip, a bent edge, or serious damage, consider taking it to a professional sharpener. Some repairs require more metal removal and specialized equipment.
A Simple Practice Routine for Beginners
If this is your first time using a stone knife sharpener, practice on an inexpensive but useful kitchen knife. Avoid starting with a valuable Japanese knife or a thin, high-performance blade.
Try this routine:
-
Wet or oil the stone as directed.
-
Secure the stone on a damp towel or holder.
-
Color the bevel with a washable marker.
-
Set the blade near a 15 to 20-degree angle.
-
Make five slow strokes from heel to tip.
-
Check where the marker has disappeared.
-
Adjust the angle if needed.
-
Continue until you can feel a small burr.
-
Repeat on the other side.
-
Use lighter alternating strokes to remove the burr.
-
Test the knife on paper or a soft food.
The first few sessions may not produce a perfect edge. That is normal. Sharpening is a hands-on skill, much like learning to whisk eggs or fold dough. Your consistency improves through repetition.
Frequently Asked Questions About How to Use a Stone Knife Sharpener
Should I soak every stone before using it?
No. Some water stones need soaking, while splash-and-go, ceramic, diamond, and oil stones may not. Follow the instructions for your specific stone to avoid damage.
What angle should I use on a kitchen knife?
Most kitchen knives work well at about 15 to 20 degrees per side. A consistent angle is more important than choosing an exact number.
How many strokes should I make on each side?
There is no fixed number because blade condition and stone grit vary. Make enough controlled strokes to raise a burr, then repeat on the other side and finish with lighter alternating strokes.
Can I use water on an oil stone?
Usually, no. Oil stones are designed to work with honing oil, and water may not provide the right lubrication or cleaning action.
How do I know when my knife is sharp?
A sharp knife should slice paper or soft food with little pressure. Test carefully and never slide a finger along the blade to check it.
Why does my knife feel sharp in some places but dull in others?
This usually means the angle or pressure changed during sharpening. Slow down, use a stable grip, and check the bevel with a marker to find uneven areas.
Can a stone sharpener damage a knife?
Yes, improper pressure, a poor angle, or an uneven stone can remove too much metal or create an uneven edge. Gentle strokes and regular stone maintenance reduce this risk.
Conclusion
Using a stone knife sharpener is a skill built on patience, control, and a steady angle. Prepare the stone correctly, secure it well, sharpen from heel to tip, check for a burr, and use lighter strokes as the edge improves.
Start with a medium-grit stone and an inexpensive kitchen knife. Practice slowly, learn how your stone behaves, and treat every sharpening session as a small lesson. With regular care, your knives can stay safer, sharper, and more enjoyable to use. Explore more knife-care guides, and share your sharpening questions or results in the comments.