
Clean an ice maker without vinegar using warm water, mild dish soap, a soft brush, and a clean rinse.
Learning how to clean an ice maker without vinegar is simple when you use the right tools and follow the maker’s care guide. This method removes slime, scale, dust, and stale odors without leaving a sharp vinegar smell. The steps below work for many refrigerator ice makers and portable ice machines, but always check your model’s manual first.
Why Clean Your Ice Maker Without Vinegar?
Ice makers sit close to food and water, so small amounts of grime can affect ice quality. Mineral deposits may build up around the water inlet, tray, scoop, and storage bin. Dust and moisture can also create a thin film that causes bad smells.
Vinegar is a common cleaner, but some people dislike its odor. Others may not have vinegar at home or may worry about its effect on rubber seals and certain metal parts. You can still clean an ice maker well with mild dish soap, warm water, baking soda, or a manufacturer-approved cleaner.
Regular cleaning can help:
• Remove dirt, slime, and loose mineral deposits
• Reduce stale odors
• Improve the taste and smell of ice
• Keep the ice bin and scoop more sanitary
• Help the machine work more smoothly
Cleaning does not fix every problem. If the ice maker has mold inside sealed parts, a blocked water line, or a faulty drain pump, you may need professional service.

What You Need Before You Start
Gather your supplies before you begin. This makes the job faster and helps you avoid using harsh products by mistake.
You will need:
• Warm water
• A small amount of mild, unscented dish soap
• A soft microfiber cloth
• A soft toothbrush or small nylon brush
• Paper towels or a dry towel
• A small bowl
• Baking soda for odors, if needed
• Food-contact-safe sanitizer approved for the machine, if the manual allows it
• Clean gloves, especially if you have sensitive skin
Avoid steel wool, abrasive powder, rough scrub pads, and strong bathroom cleaners. These products can scratch plastic and metal surfaces. Scratches may trap dirt and make future cleaning harder.
Before using any cleaner, read the ice maker manual. Some portable ice makers have removable water tanks and drain plugs. Refrigerator ice makers may have parts that should not be soaked.
How to Clean an Ice Maker Without Vinegar: Step-by-Step
1. Turn off and unplug the machine
For a portable ice maker, press the power button and unplug it. For a refrigerator ice maker, turn off the ice-making function. If your model has a separate power switch, use it.
Do not put your hands near moving parts while the machine is running. Let recently made ice melt or remove it with a scoop. Never use a sharp tool to break up stuck ice because it can damage the tray or cooling parts.
2. Remove the ice and water
Throw away all ice in the bin. Do not keep ice that was made before cleaning because it may contain loose dirt or cleaner residue.
Drain the water reservoir if your machine has one. Look for a drain plug or drain tube. Place a towel under the machine if water may spill.
3. Take out removable parts
Remove the ice bin, scoop, water filter, tray, and other parts listed as removable in the manual. Do not force a part that does not come out easily.
Wash removable plastic parts in warm water with a few drops of mild dish soap. Use a soft brush around corners, hinges, grooves, and the underside of the bin.
4. Clean the inside
Mix warm water with a small amount of mild dish soap. A teaspoon of soap in a quart of water is usually enough for general cleaning.
Dip a soft cloth into the solution and wring it out well. Wipe the inside walls, ice chute, water reservoir, door seal, and areas around the ice tray. Use a soft toothbrush for narrow seams.
Do not pour a large amount of water into the machine. Water can reach electrical parts and cause damage. A damp cloth is safer than soaking the entire interior.
5. Treat mineral deposits gently
Hard water can leave white or cloudy deposits. Start by wiping the area with warm, soapy water. Let the damp cloth sit on the deposit for a few minutes, then brush gently.
If the buildup remains, use a descaling product made for ice makers or food-contact equipment. Follow the product label closely. Some products require several rinse cycles before the machine is safe to use again.
Baking soda can help with light residue and odors, but it is not a true descaler or disinfectant. Make a thin paste with baking soda and water, apply it to a stubborn spot, and wipe it away. Do not use this method on parts that the manufacturer says not to scrub.
6. Clean the water filter area
If your ice maker has a water filter, remove it only if the manual says it is replaceable or washable. Many refrigerator filters are designed for replacement, not hand washing.
Wipe the filter housing with a clean, damp cloth. Check for slime, dust, or trapped particles. Replace an old filter according to the maker’s schedule or sooner if the ice tastes bad.
7. Rinse every cleaned surface
Rinsing is one of the most important steps when learning how to clean an ice maker without vinegar. Soap left behind can make ice taste bitter and may irritate the mouth.
Use a fresh cloth dampened with clean water. Wipe every surface that touched the soapy solution. Rinse removable parts under running water if the manual allows it.
8. Sanitize when appropriate
Cleaning removes dirt, but sanitizing reduces germs. If your manufacturer allows it, use a sanitizer labeled for food-contact surfaces and ice machines.
Follow the label’s mixing ratio and contact time. Do not guess the amount. Never mix sanitizer with dish soap, bleach, ammonia, hydrogen peroxide, or another cleaner.
Some people use diluted 3% hydrogen peroxide, but this is not suitable for every ice maker. It may harm certain materials, and the machine must be rinsed well. Use it only when the manufacturer permits it and the product label supports the intended use.
9. Dry and reassemble
Dry removable parts with a clean towel or let them air dry fully. Moisture left in seams can encourage odors and slime.
Reassemble the machine according to the manual. Make sure the water filter, drain plug, ice bin, and tray are seated correctly.
10. Run and discard the first batch
Add fresh water and run one or two cycles. Throw away the first batch of ice after cleaning. This removes any remaining odor, loose residue, or cleaner traces.
Taste the next batch only after the machine has completed a full rinse cycle. If the ice still tastes strange, turn off the machine and repeat the rinse process.

How to Clean a Portable Ice Maker Without Vinegar
Portable ice makers often need more frequent cleaning because their water reservoir stays warm and damp between uses. That damp space can develop a slimy film if the water is not changed often.
Use this simple process:
-
Turn off and unplug the unit.
-
Remove all ice and drain the reservoir.
-
Take out the ice basket and scoop.
-
Wash these parts with warm water and mild dish soap.
-
Wipe the reservoir with a soft cloth.
-
Brush around the water outlet and drain area.
-
Rinse the reservoir with clean water.
-
Drain the rinse water completely.
-
Wipe the outside vents and control panel with a damp cloth.
-
Let the unit air dry before closing the lid.
Never submerge a portable ice maker unless the manual clearly says it is safe. The compressor, fan, and electrical controls must stay dry.
A useful habit is to leave the lid open for a short time after draining. This allows the reservoir to dry and reduces musty smells.

How to Clean a Refrigerator Ice Maker Without Vinegar
A refrigerator ice maker may have a storage bin, ice chute, water inlet, and removable tray. It may also share water with the refrigerator dispenser.
First, turn off the ice maker and empty the bin. Wash the bin in warm, soapy water if the manual allows it. Rinse it well and dry it before putting it back.
Wipe the ice chute and door seal with a damp cloth. These areas often collect crumbs, dust, and moisture. Use a soft brush around the chute flap, but do not pull or bend the rubber.
If the ice maker has frozen clumps, let them melt naturally. Avoid knives, screwdrivers, and hair dryers. Heat or sharp tools can damage plastic parts and nearby wiring.
Check the water filter date, too. A dirty filter can cause bad-tasting ice even when the ice maker itself is clean.

How to Remove Bad Smells Without Vinegar
Bad odors often come from old ice, dirty bins, stagnant water, or food smells from the freezer. Cleaning the bin alone may not solve the problem if the source is inside the water reservoir or chute.
Baking soda can absorb mild odors. Place a small open container of baking soda in the freezer area, away from the ice. Do not pour baking soda into the water tank unless the machine manual allows it.
For a stronger odor, clean the ice bin and wipe nearby freezer surfaces with warm water and mild dish soap. Rinse the surfaces with a clean damp cloth. Then make and discard one or two batches of ice.
If the smell resembles rotten eggs, chemicals, or burning plastic, stop using the machine. Contact the manufacturer or a qualified appliance technician. A strong unusual smell may signal a water, electrical, or mechanical problem.
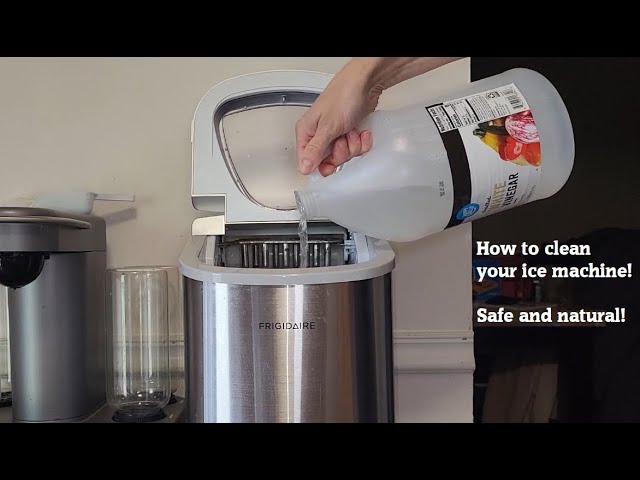
Common Mistakes to Avoid
Many ice maker problems happen because people use too much cleaner or skip the rinse. The machine may look clean but still produce poor-tasting ice.
Avoid these mistakes:
• Do not use undiluted bleach unless the manufacturer specifically instructs you to do so.
• Do not mix bleach with ammonia, acids, dish soap, or other cleaners.
• Do not use scented dish soap because fragrance may remain on food-contact surfaces.
• Do not spray cleaner into vents, buttons, wiring, or the compressor area.
• Do not use metal tools to scrape ice or mineral deposits.
• Do not return old ice to a clean bin.
• Do not run the machine with a missing drain plug or loose filter.
• Do not skip the final rinse.
• Do not assume baking soda kills all germs.
• Do not use a homemade cleaner that the manual does not support.
One mistake I have seen often is cleaning the ice bin but ignoring the scoop and chute. Those parts touch the ice every day. A clean bin can become dirty again quickly if the scoop is not washed and dried.
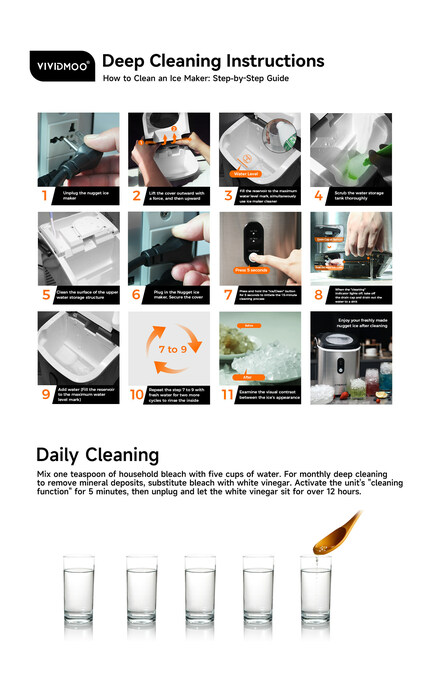
How Often Should You Clean an Ice Maker?
Most home ice makers benefit from a basic cleaning every one to three months. Clean sooner if the ice smells bad, tastes unusual, looks cloudy, or has visible particles.
You may need a more frequent schedule when:
• You use hard water
• The machine sits in a warm room
• The ice maker is used every day
• The water reservoir is not drained between uses
• Several people share the ice scoop
• The ice bin becomes wet or sticky
• The manufacturer recommends monthly cleaning
Replace water filters on the schedule printed on the filter or in the manual. Filter life varies by model, water quality, and household use.
A quick weekly check also helps. Look inside the bin, inspect the scoop, and remove old ice. Small care steps prevent heavy buildup later.
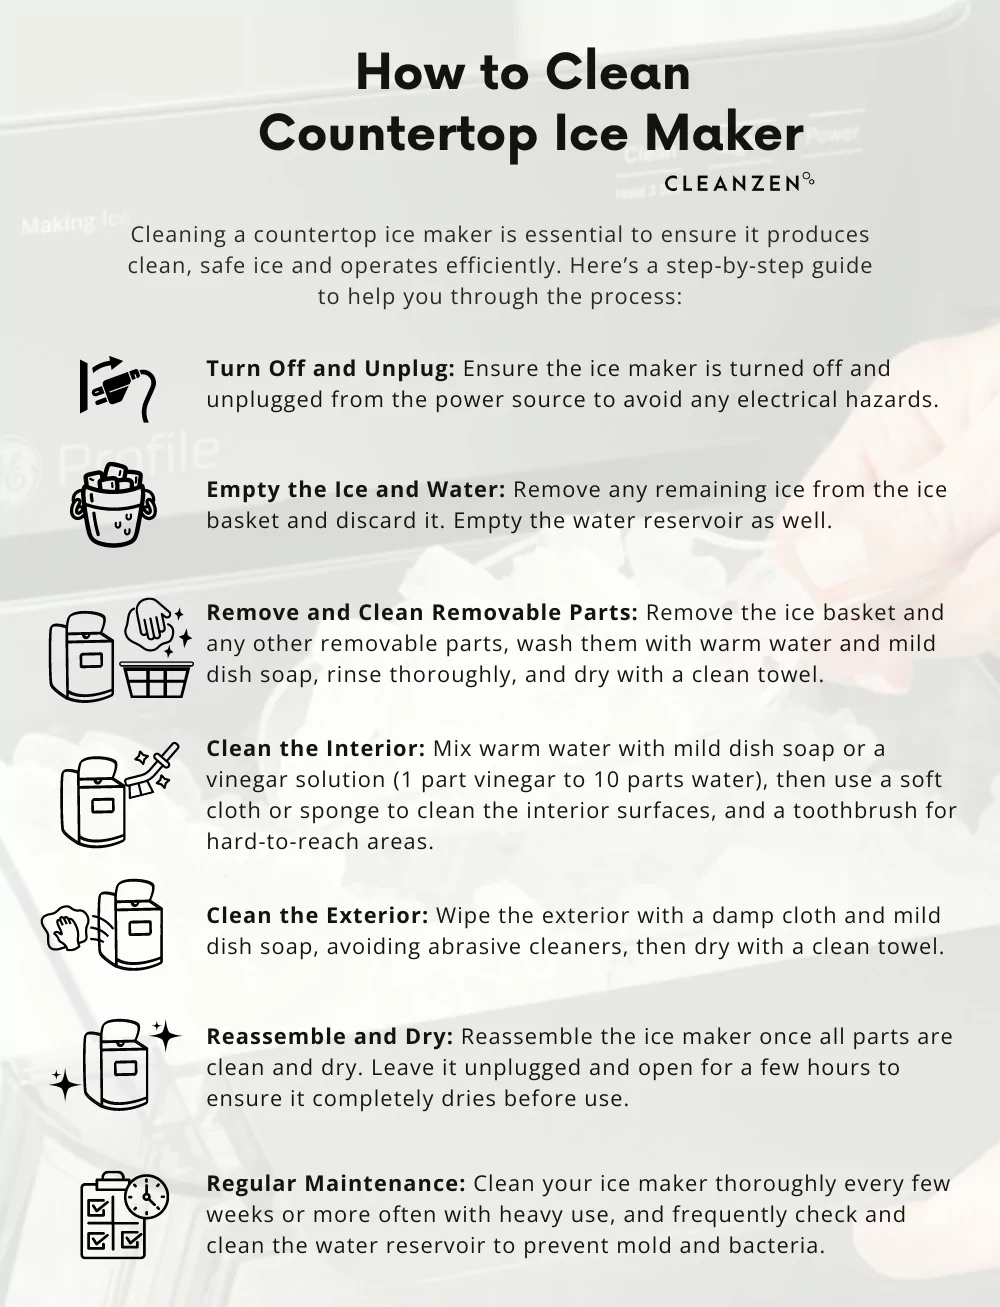
Cleaning and Sanitizing Are Not the Same
Cleaning removes visible dirt, grease, residue, and mineral deposits. Sanitizing is a separate step that lowers the number of germs on a properly cleaned surface.
You should always clean first. A sanitizer cannot work well through a layer of slime or food residue.
For an ice maker, use only a product approved for food-contact surfaces and follow its label. The label should explain the correct amount, contact time, and rinse instructions.
This distinction matters because baking soda may help freshen an odor, but it does not replace a sanitizer. Dish soap removes dirt, but it is not designed to disinfect. A manufacturer-approved ice machine cleaner may both loosen mineral scale and provide cleaning directions for internal parts.

When to Call a Professional
Cleaning can solve many odor and residue problems, but it cannot repair a damaged component. Get professional help if the machine still fails after cleaning and rinsing.
Contact a technician when:
• The ice maker leaks
• The water inlet stays blocked
• The machine makes grinding or buzzing sounds
• Ice production stops completely
• Mold returns quickly after proper cleaning
• The ice tastes like chemicals after several rinses
• The unit trips a breaker
• The water line freezes again and again
• A sealed internal part needs removal
Do not open electrical panels or sealed refrigeration parts unless you are trained to do so. Appliance repairs can involve electric shock, sharp metal, pressurized refrigerant, and water damage.
Frequently Asked Questions About How to Clean an Ice Maker Without Vinegar
Can I clean an ice maker with dish soap?
Yes, mild unscented dish soap works well for removable parts and light interior dirt. Use only a small amount, then rinse every surface several times with clean water.
Can I use baking soda to clean an ice maker?
Baking soda can help remove mild odors and light residue. It does not replace a descaler or sanitizer, so use a product approved for ice machines when mineral buildup or sanitation is the main concern.
Is hydrogen peroxide safe for an ice maker?
It may be safe for some machines, but not all materials tolerate it. Use hydrogen peroxide only when the manufacturer permits it, follow the product directions, and rinse the machine completely.
How many ice batches should I throw away after cleaning?
Discard at least the first batch after cleaning. If you notice a soapy, chemical, or unusual taste, run another rinse cycle and discard the next batch as well.
How often should I clean my ice maker?
A basic cleaning every one to three months works for many homes. Clean more often if you use hard water, notice an odor, or use a portable ice maker every day.
Can I clean an ice maker without unplugging it?
You can wipe some outside surfaces while it is plugged in, but turn off and unplug the machine before removing parts or cleaning the inside. This lowers the risk of electric shock and accidental movement.
Why does my ice still smell after cleaning?
The odor may come from an old water filter, freezer food, a damp drain area, or hidden buildup. Clean nearby surfaces, replace the filter if needed, rinse the machine again, and seek service if the smell remains.
Conclusion
Learning how to clean an ice maker without vinegar only requires a gentle method and careful rinsing. Turn off the machine, remove old ice, wash removable parts with mild dish soap, wipe the interior, treat mineral deposits safely, and discard the first batch after cleaning.
Follow your model’s manual, avoid harsh chemical mixtures, and keep electrical areas dry. A short cleaning routine every one to three months can help your ice stay fresh and your machine run better. Try these steps during your next kitchen cleaning session, and share your results or favorite maintenance tips in the comments.