
Set the freezer to 0°F, keep the water supply clear, and adjust the ice maker’s fill level if your model allows it.
Learning how to adjust an ice maker to make more ice is often easier than replacing parts or buying a countertop machine. Small changes to freezer temperature, water flow, ice maker settings, and storage can improve production. This guide explains safe adjustments, common problems, and practical checks that help your ice maker work at its best.
How an Ice Maker Makes Ice
An automatic ice maker needs four things: cold air, water, power, and space to release the finished cubes. A thermostat starts the cycle when the ice mold reaches a low enough temperature. A small motor then moves the ice cubes out, and the water valve fills the mold again.
Most refrigerator ice makers do not run continuously. They pause when the storage bin is full, when the freezer is too warm, or when the shutoff arm rises. That means a slow ice maker may not be broken. It may simply be waiting for the right conditions.
The fastest way to improve production is to remove anything that slows one of these steps. Check temperature first, then inspect the water supply and ice maker settings.

Check the Freezer Temperature First
Freezer temperature has a major effect on ice production. Most household freezers work best at 0°F, or about -18°C. Ice production may slow when the freezer rises above 10°F, even if frozen food still feels solid.
Use a separate appliance thermometer to check the real temperature. The control panel setting is useful, but it may not show the temperature near the ice maker. Place the thermometer in the freezer for several hours before judging the result.
To improve freezer temperature:
• Set the freezer to 0°F.
• Keep the door closed as much as possible.
• Leave space around air vents.
• Move large items away from the ice maker.
• Check that the door gasket seals tightly.
• Allow hot food to cool before placing it inside.
Do not set the freezer far below 0°F just to make more ice. Extremely low temperatures can waste energy and may not increase production. They can also make some refrigerator parts work harder.
If the freezer is warm, wait 12 to 24 hours after changing the setting. Ice makers need time to respond. This simple waiting period prevents many false diagnoses.
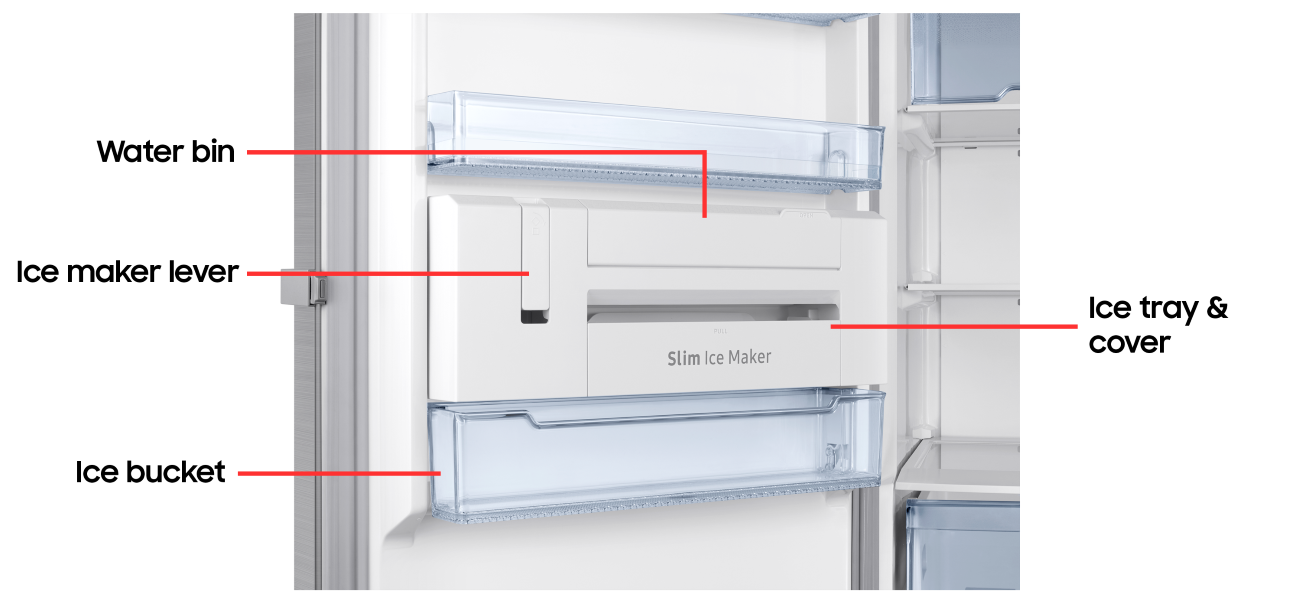
Adjust the Ice Maker Fill Level
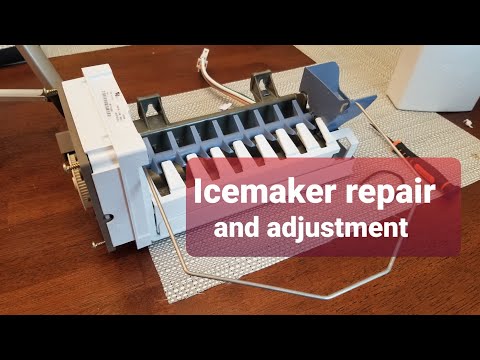
Many modular ice makers have a small adjustment screw. This screw can change how much water enters the ice mold during each cycle. Increasing the fill level may produce larger cubes, but it does not always create more total ice.
Before making an adjustment, unplug the refrigerator or switch off its circuit if the adjustment requires access to electrical parts. Some models have exposed components, so follow the appliance manual carefully.
A common adjustment method looks like this:
-
Find the adjustment screw on the front or side of the ice maker module.
-
Look for a small mark, plus sign, or minus sign.
-
Turn the screw only a small amount, often one-eighth of a turn.
-
Use the direction shown in the manual. On many models, turning clockwise increases the fill time.
-
Restore power and wait several cycles before checking the result.
-
Check for water overflowing the mold or freezing into a solid sheet.
A larger fill may help if the cubes are very small. However, too much water can cause leaks, frozen ejector parts, and cubes that stick together. The goal is a clean fill, not the largest possible cube.
When learning how to adjust an ice maker to make more ice, change only one setting at a time. Small changes are easier to track and safer for the appliance.

Make Sure the Ice Maker Has Enough Water
Low water flow is one of the most common reasons for slow ice production. A refrigerator may still make ice with weak flow, but the mold can take longer to fill. The result is small cubes and long gaps between cycles.
Start with the water supply line behind the refrigerator. Make sure it is not bent, crushed, or pinched. Check that the shutoff valve is fully open.
Then inspect the refrigerator water filter. A clogged filter can reduce flow to both the dispenser and the ice maker. Many manufacturers suggest replacing filters about every six months, but the correct interval depends on water quality and use.
Signs of a water flow problem include:
• Small or hollow ice cubes.
• A slow water dispenser.
• A buzzing sound without much water entering the mold.
• Long fill times.
• Ice that tastes unusual after the filter becomes old.
If the refrigerator uses a saddle valve, consider having a qualified plumber replace it with a proper shutoff valve. Saddle valves can restrict flow and may leak as they age.
Never remove a water filter permanently unless the refrigerator manual allows filter bypass use. Unfiltered water may contain sediment that can block the inlet valve or affect ice quality.

Inspect the Shutoff Arm and Ice Bin
The shutoff arm tells the ice maker when to stop. When the bin fills, the ice pushes the arm upward. The ice maker then pauses until the arm drops again.
Make sure the arm moves freely. Do not force it down, tie it in place, or tape it down. Bypassing the shutoff system can cause the ice maker to overfill and spill ice inside the freezer.
Also check whether ice cubes are packed around the arm. A frozen clump can hold the arm in the stop position even when the bin is not full. Remove loose ice by hand, and let stubborn buildup soften naturally.
The storage bin can also affect how much ice seems available. Ice may pile up near the sensor while the rest of the bin remains empty. Spread the cubes evenly so the shutoff system can read the bin correctly.
In one common troubleshooting case, the ice maker seemed slow because a single large chunk had wedged against the arm. Breaking up the clump restored normal operation without changing any settings.
Improve Airflow Around the Ice Maker
Cold air must reach the ice maker for the water to freeze. Food packages, ice bags, and frost can block vents near the ice maker or evaporator fan.
Keep several inches of open space around major vents. Avoid placing tall containers directly in front of the ice maker. Do not cover vents with plastic bags or food boxes.
Heavy frost is another warning sign. Frost can block airflow and raise the freezer temperature. It may come from a damaged door gasket, a door left open, a blocked drain, or a defrost system problem.
Never chip hard frost with a knife or sharp tool. You can puncture a refrigerant line or damage the freezer wall. If the manual permits it, turn the refrigerator off and allow the frost to melt. Place towels nearby to catch water.
If thick frost returns, the issue is likely larger than an ice maker setting. A technician may need to inspect the gasket, fan, defrost heater, or control board.

Use the Right Ice Maker Settings
Some newer refrigerators include an Ice Max, Fast Ice, Accelerated Ice, or similar mode. These settings may lower freezer temperature or run the ice maker more often for a limited time.
Use the feature when you expect extra demand, such as before a family gathering. Read the manual because the feature may increase energy use and may not work if the water filter is blocked or the freezer is too warm.
Other useful settings include:
• Ice maker on or off.
• Vacation mode.
• Door alarm settings.
• Freezer temperature control.
• Water filter status.
A fast-ice mode cannot fix a weak water valve, blocked filter, or warm freezer. Think of it as a boost, not a repair.
If the ice maker has a removable bin, keep it installed correctly. Some models use the bin position to activate a sensor or switch. A bin that sits too low or too far forward may stop production.
Adjust the Ice Maker Without Causing Damage
Safe adjustment matters because an ice maker combines water and electricity in a cold space. Avoid touching exposed wiring or forcing gears by hand.
Follow these basic safety rules:
• Disconnect power before opening the ice maker module.
• Do not pour hot water over plastic parts.
• Do not use sharp tools to remove frozen cubes.
• Do not adjust internal parts while the motor is running.
• Keep water away from electrical connections.
• Use only parts made for your refrigerator model.
If water is leaking into the ice bin, stop the ice maker and close the water supply valve. A leaking inlet valve can overfill the mold and create a large block of ice.
If the ice maker makes a clicking or grinding sound, avoid repeated manual cycling. The motor, gear, or ejector may be damaged. A repair professional can test the module safely.
The best approach to learning how to adjust an ice maker to make more ice is to make gentle changes and observe the full cycle. Patience protects both the appliance and your wallet.
Troubleshoot Slow Ice Production
When the ice maker produces too little ice, use a step-by-step process. Start with simple causes before testing expensive parts.
-
Confirm that the ice maker is switched on.
-
Set the freezer near 0°F.
-
Check that the shutoff arm is down and free of ice.
-
Inspect the water line for bends.
-
Test the water dispenser flow.
-
Replace an old or blocked filter.
-
Clear items from freezer vents.
-
Check for heavy frost.
-
Adjust the fill level only if the model supports it.
-
Wait at least 24 hours after each major change.
If the water dispenser works well but the ice maker does not fill, the inlet valve, ice maker thermostat, control module, or wiring may be at fault. If the mold fills but cubes never eject, the motor or thermostat may need service.
A normal household ice maker may produce roughly 3 to 10 pounds of ice per day, depending on the model, room temperature, freezer temperature, and water supply. Always compare performance with the specifications for your exact appliance.
Do not judge production after one hour. Many machines need several hours to reach a full cycle, and the first batch after startup may be smaller.
How to Get More Ice From the Storage Bin
Making ice faster is only part of the problem. Good storage helps you keep more usable ice.
Keep the bin clean and dry. Old ice can absorb freezer odors and stick together. Empty the bin occasionally, wash it with mild soap, rinse it well, and let it dry before replacing it.
Do not store food inside the ice bin. Food can block the mechanism, affect taste, and create a hygiene concern. Scoop ice with a clean utensil instead of using hands or a drinking glass.
If you need extra ice for an event, remove finished cubes from the bin and store them in sealed freezer bags or containers. This gives the ice maker room to continue cycling. It also prevents the shutoff arm from stopping too early because of an uneven pile.
Avoid expecting a refrigerator ice maker to supply ice for a large party without preparation. For very high demand, a temporary countertop ice maker or purchased ice may be more practical.
Common Mistakes to Avoid
Several quick fixes can create new problems. The most common mistake is turning the fill adjustment too far. More water does not always mean more ice, and an overfilled mold can freeze around the ejector fingers.
Another mistake is lowering the freezer temperature too much. A setting below the recommended range may increase energy use without producing a meaningful increase in ice.
Avoid these habits:
• Leaving the freezer door open while checking the ice maker.
• Ignoring a water filter warning.
• Blocking the freezer air vents.
• Forcing stuck cubes with a metal tool.
• Holding the shutoff arm down.
• Changing several settings at once.
• Running the ice maker with a leaking water line.
During appliance work, I have found that the simplest checks often solve the issue. A blocked vent or half-closed valve can look like a failed ice maker. A calm inspection is usually better than immediately buying a replacement module.
When to Call a Professional
Some problems require electrical or refrigeration skills. Contact a qualified appliance technician when the ice maker continues to fail after basic checks.
Professional service is wise when:
• The freezer cannot reach 0°F.
• The ice maker leaks after a fill adjustment.
• The water valve hums but does not open.
• The freezer has repeated heavy frost.
• The fan does not run.
• Wiring looks damaged or burned.
• The ice maker trips a circuit breaker.
• The control board may be faulty.
Refrigerant systems should not be opened by an untrained person. Refrigerant handling and sealed-system repairs require proper tools and certification in many situations.
Before scheduling service, record the refrigerator model number, symptoms, temperature, water flow, and any error codes. This information can help the technician diagnose the problem faster.
Frequently Asked Questions About How to Adjust an Ice Maker to Make More Ice
Can I turn a screw to make my ice maker produce more ice?
Some modular ice makers have a fill-level adjustment screw. It changes the amount of water used per cycle, so follow the manufacturer’s instructions and make only small adjustments.
Does lowering the freezer temperature make more ice?
A freezer set near 0°F usually supports reliable ice production. Lowering it far below 0°F usually does not create a major increase and may waste energy.
Why is my ice maker making small cubes?
Small cubes often result from low water flow, a clogged filter, a partially closed valve, or an incorrect fill setting. Check these causes before replacing the ice maker.
How long does it take for an ice maker to make ice?
Many refrigerator ice makers need one to two hours for a cycle, but the first batch may take longer. Full production can take 12 to 24 hours after startup or after a temperature change.
Should the ice maker arm be up or down?
The arm is usually down when the ice maker is operating and up when it is off or full. Never force the arm because it can damage the shutoff mechanism.
Can a water filter affect ice production?
Yes. A clogged or old water filter can reduce flow and lead to small cubes or slow filling. Replace it at the interval listed in the refrigerator manual.
How often should I clean the ice maker?
Clean the ice bin and removable parts when they look dirty, smell unusual, or contain old, stuck ice. Follow the appliance manual for deeper cleaning and sanitizing instructions.
Conclusion
The most reliable way to adjust an ice maker to make more ice is to set the freezer near 0°F, protect airflow, maintain strong water flow, and use only the fill adjustment approved for your model. Check the shutoff arm, filter, water valve, and ice bin before assuming the appliance needs repair.
Make one change at a time, wait for several cycles, and watch for leaks or overfilled molds. These careful steps can improve ice production while avoiding damage. Try the checks above, consult your refrigerator manual, and share your results or questions in the comments.