
Your ice maker may be leaking because of a blocked fill tube, faulty inlet valve, poor leveling, or a cracked ice tray.
When you notice water under the refrigerator, it is easy to blame the ice maker at once. The real cause may be a small part that overfills, freezes, shifts, or fails to seal. This guide explains why your ice maker is leaking water, how to find the source safely, and when a repair needs professional help.
Why Is My Ice Maker Leaking Water?
An ice maker leaks when water leaves its normal path. The water may come from the fill tube, inlet valve, ice mold, water filter, drain area, or a loose connection. In some cases, the ice maker itself works well, but a nearby refrigerator part sends water onto the floor.
The first step is to find where the water starts. Dry the area with a towel, then watch the next fill cycle if it is safe to do so. A leak that appears only during filling often points to the inlet valve, fill tube, or ice mold.
Common reasons include:
• A frozen or blocked fill tube
• A defective water inlet valve
• An ice maker that is not level
• A cracked ice mold or housing
• Excessive water pressure
• A loose water line or fitting
• A clogged or poorly fitted water filter
• A blocked drain or full drain pan
• A refrigerator that is not level from side to side
The answer to “why is my ice maker leaking water” often becomes clear once you identify whether the water appears during filling, harvesting, or melting.

Common Causes of an Ice Maker Water Leak
Frozen or blocked fill tube
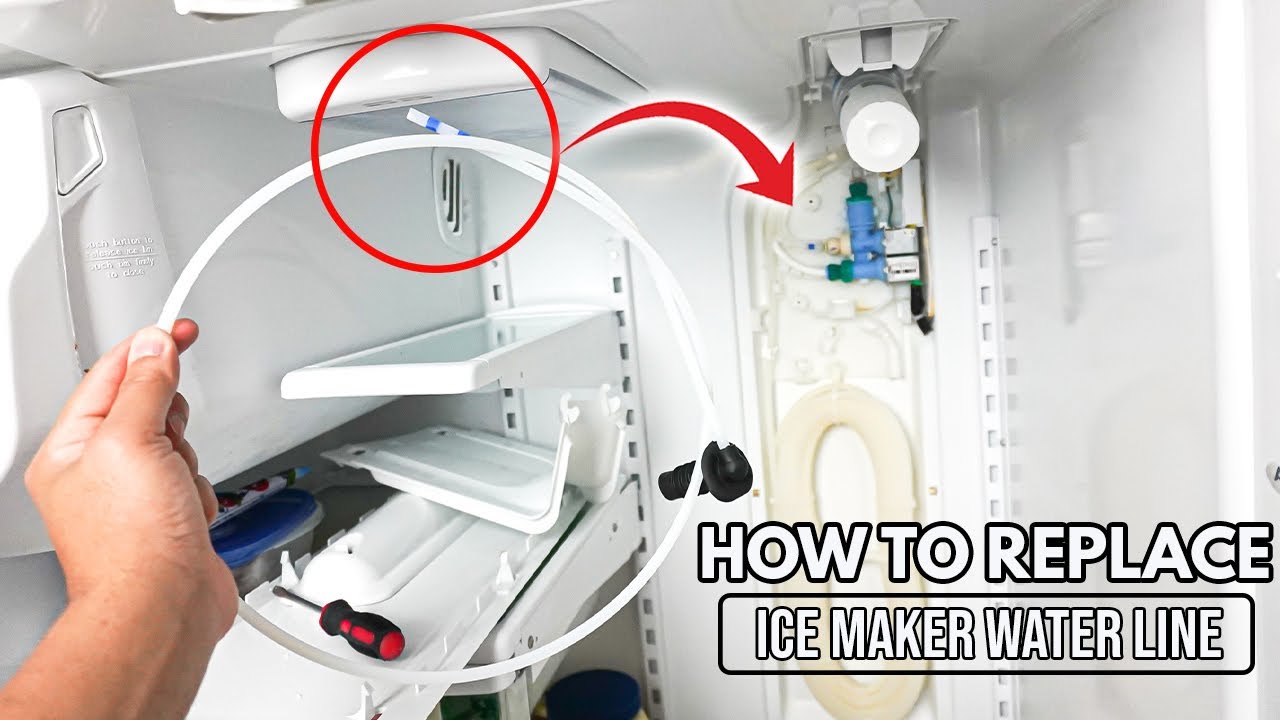
The fill tube carries water from the inlet valve to the ice maker. If the tube freezes, water may spray backward or spill into the freezer instead of entering the mold.
A frozen fill tube can result from a weak inlet valve. If the valve does not close fully, a small amount of water may continue to seep into the tube and freeze. A low freezer temperature can also make the problem worse.
Look for a tube with ice packed inside it. Do not use a sharp tool to remove the ice. A hair dryer on a low setting may help, but keep it away from standing water and plastic parts.
Faulty water inlet valve
The water inlet valve opens when the ice maker calls for water. It should close firmly after the mold fills. If it sticks open or does not seal well, water can continue to flow and cause an overflow.
A bad valve may also create slow leaks behind the refrigerator. You may hear a faint buzzing sound, notice thin sheets of ice in the mold, or see water dripping even when the ice maker is not active.
Testing the valve with a multimeter is possible, but it requires care. Always unplug the refrigerator and shut off the water supply before working near electrical parts.
Ice maker is not level
An ice maker must sit level so water stays inside the mold. If it tilts forward or to one side, water may run over the edge before it freezes.
This problem can happen after moving the refrigerator, replacing a shelf, or loosening the mounting screws. Check the ice maker with a small level if you can access it safely. Do not force the unit, because plastic mounting parts can break.
A refrigerator that leans too far can also affect the ice maker. Most refrigerators should lean slightly backward, but the exact setup depends on the model instructions.
Cracked ice mold or ice maker housing
The ice mold holds water while it freezes. Over time, repeated freezing and thawing can damage its coating or create a crack. Water then escapes into the ice bucket or freezer compartment.
A cracked mold usually needs an ice maker replacement. Small cracks are not a reliable candidate for glue or sealant because freezer temperatures and food contact make those repairs unsafe.
Water pressure is too high
High household water pressure can cause the inlet valve to deliver water too quickly. The ice maker may fill past its normal level, causing water to spill into the freezer.
Many homes have water pressure above the range recommended by appliance makers. A plumber can test the pressure and add a regulator if needed. Do not adjust the ice maker fill setting unless the product manual provides a clear procedure.
Loose or damaged water line
The water line may loosen behind the refrigerator or where it connects to the inlet valve. Plastic tubing can also crack after years of use or become pinched when the appliance is pushed against the wall.
Pull the refrigerator forward carefully. Inspect the line for wet spots, kinks, white stress marks, or a loose compression fitting. Avoid overtightening plastic fittings, since this can cause another leak.

How to Find the Source of the Leak
Finding the source is more useful than simply wiping up the water. Water can travel along a freezer floor, under a drawer, and across the bottom of the refrigerator before it reaches the floor.
Follow these steps:
-
Unplug the refrigerator if water is near electrical parts. If the food may become unsafe, move it to a working refrigerator or cooler.
-
Turn off the ice maker using its switch or shutoff arm.
-
Close the refrigerator’s water supply valve.
-
Dry the freezer floor, ice bucket, cabinet, and floor around the appliance.
-
Check the water line and filter area for fresh drops.
-
Turn the water supply on again while watching the connections.
-
If no leak appears, run one ice maker cycle and observe the fill tube and mold.
Pay attention to timing. Water that appears right after filling suggests a valve, tube, or mold issue. Water that appears hours later may come from melting ice, a blocked drain, or a poor door seal.
This simple timing test is one of the most useful ways to solve “why is my ice maker leaking water” without replacing parts at random.
How to Fix an Ice Maker That Is Leaking Water
Some repairs are simple, while others require electrical testing or sealed water connections. Start with the safest, least costly checks.
Clear a frozen fill tube
Turn off the water supply and the ice maker. Remove loose ice from the tube with a soft cloth. If needed, gently warm the tube with a hair dryer on a low setting while keeping the dryer moving.
Never use a knife, screwdriver, or other sharp object. You could puncture the tube or damage wiring hidden near the ice maker.
After the ice melts, turn the water supply back on and watch the next cycle. If the tube freezes again, the inlet valve or ice maker may be sending too much water.
Replace a damaged water filter
A filter that is not fully seated can let water escape around its housing. A clogged filter can also reduce flow and make the ice maker fill poorly.
Remove and reinstall the filter according to the refrigerator manual. If the filter is old, replace it with the correct model. Avoid forcing a filter into place, as a damaged seal can create a slow leak.
Tighten a loose connection
Hand-tighten plastic connections first. If the fitting still leaks, follow the manufacturer’s instructions for the correct wrench adjustment. Do not use excessive force.
Replace tubing that is split, brittle, or crushed. A small leak can cause mold, cabinet damage, and slippery floors over time.
Level the ice maker
Some ice makers have mounting screws that allow a small adjustment. Use the service instructions for your model. If the unit is badly tilted or its mounting bracket is damaged, replacement may be safer than adjustment.
Do not bend the ice maker by force. A small plastic crack can turn a minor repair into a full replacement.
Replace a failed inlet valve
A water inlet valve is usually replaced rather than repaired. The process involves shutting off water, unplugging the refrigerator, removing the rear access panel, labeling wires, and transferring the water lines.
Because the valve combines water and electricity, many homeowners choose a qualified appliance technician. This is especially wise if the leak is large or the shutoff valve does not work.
What to Check After the Repair
A repair is not complete until the refrigerator passes a short leak test. Turn the water supply on slowly and inspect every connection.
Check these areas:
• The water line behind the refrigerator
• The filter housing
• The inlet valve
• The fill tube
• The ice mold
• The freezer floor
• The ice bucket
Run two or three ice maker cycles if possible. Watch for water spraying, overflowing, or freezing in the wrong place. Then check the floor again after several hours.
One practical lesson from appliance troubleshooting is to avoid changing several parts at once. If you replace the valve, filter, and ice maker together, you may stop the leak but never learn what caused it. Testing one likely cause at a time saves money and makes future repairs easier.
How to Prevent Future Ice Maker Leaks
Routine care can reduce the chance of another leak. It cannot prevent every part failure, but it helps you spot problems early.
Use these habits:
• Replace the water filter on the schedule in the owner’s manual.
• Keep the freezer near 0°F, which is the standard target for food storage.
• Make sure the ice maker is not packed with clumped or melted ice.
• Keep the refrigerator level and leave room behind it for the water line.
• Inspect the water line every few months.
• Do not overload the ice bucket or force it into place.
• Clean spills quickly to prevent frost and floor damage.
• Watch for thin ice sheets, hollow cubes, or unusually wet ice.
Ice that is fused together may signal melting and refreezing. Very small or wet cubes may point to low water flow, a clogged filter, or a valve problem. These clues can appear before a visible leak.
Manufacturer service guidance commonly recommends using the correct filter, maintaining proper freezer temperature, and avoiding unapproved parts. Those details matter because a part that fits may still have the wrong water flow rate or seal.
When to Call an Appliance Technician
Call a professional when the leak continues after basic checks, the inlet valve needs testing, or water has reached electrical components. You should also get help if the water shutoff valve will not close.
Professional service is a good choice when:
• The refrigerator leaks even with the ice maker turned off
• Water is coming from inside the cabinet
• The ice maker has a cracked housing
• The water line is behind a built-in refrigerator
• The floor or wall shows signs of water damage
• You smell burning or see damaged wiring
• The refrigerator is still under warranty
Stop using the ice maker until the problem is repaired. A small leak can damage flooring, cabinets, insulation, and electrical parts. Water damage often costs more to fix than the original appliance problem.
Safety Tips Before You Troubleshoot
Water and electricity can create a serious hazard. Take basic precautions before inspecting the appliance.
• Unplug the refrigerator when removing panels or testing electrical parts.
• Shut off the water supply before disconnecting any line.
• Keep a towel and shallow container nearby.
• Do not use sharp tools to remove ice.
• Do not work on wet electrical connections.
• Wear gloves when handling sharp metal panels.
• Keep children and pets away from standing water.
If the refrigerator contains medicine or valuable food, protect those items first. A repair can wait a short time, but spoiled food and water damage can create bigger problems.
Frequently Asked Questions About Why Is My Ice Maker Leaking Water
Why is my ice maker leaking water into the ice bucket?
A cracked ice mold, an overfilled mold, or a faulty inlet valve can send extra water into the bucket. Turn off the ice maker, inspect the mold, and check for ice around the fill tube.
Why is my ice maker leaking water into the freezer?
A frozen fill tube, tilted ice maker, or cracked mold can send water onto the freezer floor. Dry the area, watch one fill cycle, and avoid using sharp tools to remove frozen water.
Can a water filter cause my ice maker to leak?
Yes. A loose, damaged, or incorrect filter can leak at the filter housing and make it seem like the ice maker is the source. Remove and reinstall the filter correctly, or replace it with the approved model.
Why does my ice maker leak only at night?
The leak may occur during an automatic fill cycle when no one is watching. A slow inlet valve leak can also build up over several hours and become visible later.
Is it safe to use an ice maker that is leaking?
It is best to turn it off until you find the cause. Continued leaking can damage the freezer, flooring, cabinets, or electrical parts.
How much does it cost to repair a leaking ice maker?
The cost depends on the cause, model, labor rate, and part needed. A filter or loose connection may cost little, while a new inlet valve or complete ice maker can cost much more.
Conclusion
A leaking ice maker is usually caused by a blocked fill tube, faulty inlet valve, uneven installation, damaged mold, loose water line, or filter problem. Start by turning off the ice maker, drying the area, and watching where fresh water first appears.
Use safe checks before replacing parts, and call a technician when water reaches electrical areas or the leak continues. If you found this guide helpful, share your experience or explore more appliance repair resources to keep your refrigerator working safely.