
An ice maker freezes water in a mold, releases the cubes, and refills automatically.
If you have ever wondered how does an ice maker in a freezer work, the answer involves a simple mix of water, temperature control, gears, sensors, and timing. Once you understand each step, it becomes much easier to use, clean, and troubleshoot your freezer ice maker.
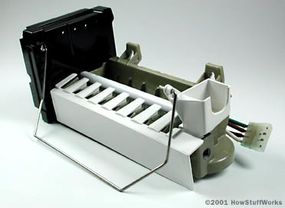
How does an ice maker in a freezer work?
An automatic ice maker is a small appliance inside the freezer. It uses a water supply, an ice mold, a cooling system, a motor, and one or more sensors to make ice without daily effort.
The process usually follows these steps:
- A water inlet valve opens.
- Water flows into the ice mold.
- The freezer cools the water until it becomes ice.
- A thermostat or sensor detects that the ice is ready.
- A motor turns an ejector arm.
- The cubes fall into the ice bin.
- The ice maker calls for more water.
This cycle repeats until the storage bin is full or the ice maker is switched off. So, how does an ice maker in a freezer work in simple terms? It acts like a tiny automated tray that fills, freezes, empties, and refills.
Most household ice makers do not freeze water with a separate cooling unit. Instead, they use the cold air already produced by the freezer’s refrigeration system. The ice maker itself controls the timing and movement, while the freezer supplies the cold environment.

The main parts of a freezer ice maker
Knowing the main components makes the whole process easier to understand. Although designs vary by brand and model, most ice makers contain similar parts.
Ice mold
The ice mold is a tray with several small sections. These sections shape the water into cubes, crescents, or other forms.
Many molds use plastic. Some older or heavier models use coated metal. The mold must stay cold enough for the water to freeze but warm slightly during release so the cubes can come out.
Water inlet valve
The water inlet valve controls the flow of water from the home plumbing line. When the ice maker sends an electrical signal, the valve opens for a short time.
The valve does not stay open all day. It usually allows water to enter for only a few seconds. If the valve remains open too long, the mold may overflow and create one large sheet of ice.
Thermostat or temperature sensor
A thermostat checks the temperature of the ice mold. When the water has frozen, the thermostat signals that the ice is ready for harvest.
Newer models may use electronic sensors instead of a simple mechanical thermostat. These sensors can monitor ice production, bin level, and freezer temperature more precisely.
Motor and ejector arm
The motor turns a small gear system. This system moves an ejector arm through the mold.
As the arm turns, it pushes the finished cubes out of the mold. The cubes then drop into the storage bin below.
Shutoff arm or bin sensor
The shutoff arm stops ice production when the bin is full. Some newer ice makers use an infrared sensor or an electronic control instead.
If the arm is raised, the ice maker usually stops. If the arm is lowered and the bin has space, the ice maker can continue its cycle.
Heater
Many ice makers use a small heater under or around the mold. This heater does not melt the entire batch.
Instead, it warms the mold just enough to loosen the cubes. This small temperature change is a key part of how does an ice maker in a freezer work.

The ice-making cycle, step by step
The complete cycle often takes between one and two hours, depending on the freezer temperature, water pressure, model, and room conditions. The first batch after installation may take longer because the water line and mold must fill.
Step 1: The ice maker checks the bin
Before adding water, the ice maker checks whether it should operate. A raised shutoff arm or a full-bin sensor tells the system to stop.
This prevents the freezer from making more ice than the bin can hold. It also reduces the chance of cubes blocking the ejector arm.
Step 2: The valve fills the mold
When the ice maker is ready, it sends power to the water inlet valve. The valve opens briefly and sends water through a small tube into the mold.
The amount of water must be carefully controlled. Too little water creates small or hollow cubes. Too much water can cause overflow, frozen spills, or cubes that stick together.
Step 3: The water freezes
The freezer’s evaporator coils remove heat from the air. A fan moves that cold air around the freezer and over the ice mold.
As heat leaves the water, the water changes from liquid to solid. Most ice makers work best when the freezer stays near 0°F, the temperature recommended for safe food storage.
Step 4: The thermostat detects frozen ice
Once the ice reaches the proper temperature, the thermostat closes or changes state. This tells the control system that the batch is ready.
The exact timing varies. A packed freezer, frequent door opening, warm food, or a weak door seal can slow the freezing process.
Step 5: The mold loosens the cubes
The ice maker activates its small heater for a short period. The heater warms the mold surface, not the whole freezer.
This thin layer of melted water helps separate the cubes from the mold. The heater then turns off as the ejector mechanism begins to move.
Step 6: The ejector arm removes the ice
The motor turns the ejector arm through the mold. The arm pushes each cube upward and out of its pocket.
The cubes fall into the ice bin. Some ice makers also use fingers, paddles, or a rotating tray to release the ice.
Step 7: The cycle resets
After the cubes drop, the motor returns to its starting position. The ice maker waits for the next signal to fill the mold.
If the bin still has room, the ice maker begins another cycle. This repeated sequence explains how does an ice maker in a freezer work with very little human input.

How the freezer helps make ice
An ice maker does not work alone. It depends on the freezer’s refrigeration system to provide a stable, cold environment.
The freezer compressor moves refrigerant through coils. The evaporator coil absorbs heat from inside the freezer, while the condenser coil releases that heat outside the cabinet.
A fan spreads cold air through the freezer. The ice maker uses this cold air to freeze the water in its mold.
Several conditions affect this process:
• Freezer temperature: Ice production slows when the freezer is warmer than about 0°F.
• Door openings: Each opening lets warm, moist air inside.
• Food load: A very full freezer may block airflow around the ice maker.
• Door seal: A damaged gasket can let cold air escape.
• Defrost cycle: During automatic defrost, the freezer briefly warms, which may delay ice production.
A freezer that keeps food frozen may still be too warm for fast ice production. Ice making needs steady cold air, not just occasional low temperatures.
Why an ice maker stops making ice
When an ice maker stops working, the cause is often simple. Check the easiest issues first before replacing expensive parts.
The ice maker is turned off
Many models have a wire shutoff arm, a sliding switch, or a control button. The arm may have been raised by hand or pushed up by a pile of ice.
Make sure the control is in the operating position. Do not force it if it feels stuck.
The water supply is blocked
A closed supply valve, kinked tube, or clogged filter can stop water from reaching the mold. A frozen fill tube is also common.
If the freezer is cold but the mold stays dry, inspect the water path first. Always turn off the water supply before removing a hose.
The water filter is clogged
A dirty filter can reduce water pressure. Low pressure may produce small cubes or prevent the inlet valve from filling the mold.
Replace the filter according to the refrigerator maker’s instructions. After replacement, discard the first few batches if the manual recommends it.
The freezer is too warm
A freezer temperature above 10°F can greatly slow ice production. A faulty door gasket, blocked vent, dirty condenser, or failing fan may be responsible.
Place a reliable appliance thermometer inside the freezer. The built-in display may show the set temperature, not the actual temperature.
The ice bin is full or stuck
Ice can form a bridge that blocks the shutoff arm. Clumped cubes may also stop the ejector mechanism.
Empty the bin and separate stuck ice by hand. Never use a sharp knife near the mold or wiring.
The inlet valve is faulty
A failed valve may make a humming sound but deliver no water. In other cases, it may leak and create a frozen sheet beneath the ice maker.
Valve testing involves electrical work and water connections. If you are not comfortable using a multimeter or shutting off the supply, contact a qualified appliance technician.
Why ice cubes are small, cloudy, or taste bad
Ice quality can reveal problems in the water system or freezer.
Small cubes often point to low water pressure, a restricted filter, or a valve that opens for too little time. They can also result from a partially frozen fill tube.
Cloudy ice is usually caused by trapped air or minerals in the water. It is common in household ice makers and does not always mean the ice is unsafe.
Bad-tasting ice may come from:
• Old ice that has absorbed freezer odors
• A dirty ice bin
• An overdue water filter
• Stagnant water in the supply line
• Food stored uncovered near the ice maker
Clean the ice bin with mild dish soap and warm water. Rinse it well and let it dry fully before returning it to the freezer. Avoid strong cleaners unless the appliance manual specifically allows them.
If the ice has a chemical, metallic, or sewage-like taste, stop using it and check the water supply. A qualified professional can test the water if the issue continues.
How to maintain an automatic ice maker
Regular care helps the ice maker work longer and keeps the ice fresh. It also makes small problems easier to spot.
Clean the ice bin
Remove the bin every few months, or sooner if it smells stale. Wash it with mild soap, rinse it, and dry it before replacing it.
Do not scrape ice with metal tools. Scratches can trap dirt and bacteria.
Replace the water filter
Follow the replacement schedule in the owner’s manual. Many filters need replacement every six months, but usage and water quality can change that interval.
A filter that looks clean may still be exhausted. Filter life depends on the volume and quality of water passing through it.
Keep the freezer at the right temperature
Set the freezer near 0°F. Avoid packing food against air vents, because blocked airflow can create warm areas around the ice maker.
Let hot food cool slightly before placing it inside. Large amounts of warm food can temporarily raise the freezer temperature.
Check the door seal
Close the door on a sheet of paper. If the paper slides out easily in several spots, the gasket may not seal well.
Clean the gasket with warm water and inspect it for cracks. Replace a damaged seal rather than applying household glue.
Use the ice regularly
Fresh ice usually tastes better than ice stored for months. If you will not use the ice maker for a long time, turn it off, empty the bin, and follow the cleaning instructions in the manual.
These simple steps support the full cycle of how does an ice maker in a freezer work and reduce common breakdowns.
Safety tips before troubleshooting
An ice maker combines water and electricity. Use care when checking it.
Follow these basic rules:
• Unplug the refrigerator before removing electrical covers.
• Turn off the water supply before disconnecting a tube.
• Keep fingers away from the ejector arm while the unit is operating.
• Never use a sharp object to remove frozen ice.
• Do not bypass the shutoff switch or sensor.
• Keep electrical connectors dry.
• Follow the manufacturer’s service instructions.
A simple visual inspection is usually safe. Internal electrical tests, valve replacement, and sealed refrigeration repairs are better left to a trained technician.
Industry appliance guidance consistently stresses proper grounding, correct water connections, and safe temperature control. These details matter because a quick repair is not worth a shock, leak, or spoiled food.
Ice maker versus manual ice trays
An automatic ice maker offers convenience, but it is not perfect for every home.
Benefits of an automatic ice maker
• It produces ice without daily filling.
• It can make a steady supply for drinks and gatherings.
• It uses the freezer’s existing cooling system.
• It stops when the bin is full.
• It saves counter space compared with countertop ice machines.
Limitations of an automatic ice maker
• It needs a water connection.
• It can be noisy during filling and harvesting.
• It may make less ice in warm conditions.
• It adds mechanical parts that can fail.
• The ice bin can take up freezer space.
Manual trays are cheaper and easier to replace. An automatic model is more useful when convenience and regular ice production matter most.
What I learned from common ice maker problems
A practical lesson from working through appliance issues is to start with temperature, water, and the shutoff control. Many people assume the motor failed, but the actual problem is often a blocked fill tube, a raised arm, or a clogged filter.
Another useful lesson is not to judge freezer temperature by touch. Food may feel frozen while the freezer remains too warm for normal ice production. A small appliance thermometer gives a much clearer answer.
Avoid forcing stuck parts. Plastic gears and ejector arms can break easily. A few minutes spent reading the model’s manual can prevent a costly repair and explain how does an ice maker in a freezer work for that specific design.
Frequently Asked Questions About How Does an Ice Maker in a Freezer Work
How long does a freezer ice maker take to make ice?
Most automatic ice makers take about one to two hours per cycle. The first batch may take longer after installation, a power outage, or a period when the ice maker was turned off.
Does an ice maker need a water filter?
An ice maker can often work without a filter if the refrigerator design allows it. However, a proper filter can reduce sediment, odors, and some unwanted substances in the water.
Why is my ice maker not filling with water?
A closed valve, clogged filter, frozen fill tube, low water pressure, or faulty inlet valve can prevent filling. Check the shutoff arm and water supply before testing internal parts.
Does the freezer need to be at 0°F for the ice maker to work?
The ice maker may work above 0°F, but production usually slows as the temperature rises. Keeping the freezer near 0°F supports safe food storage and more reliable ice production.
Can I leave an ice maker on when the ice bin is full?
Yes, most automatic ice makers stop when the shutoff arm or bin sensor detects a full bin. Keep the control working properly, and do not force the arm down when the bin is already full.
Why does my ice maker make hollow cubes?
Hollow cubes often result from low water pressure, a restricted filter, a partly blocked fill tube, or an incorrect fill cycle. Check the filter and water supply first.
Conclusion
An ice maker in a freezer works through a simple but carefully timed cycle. It fills a mold with water, freezes the water using the freezer’s cold air, loosens the ice, ejects the cubes, and refills when space is available.
The best way to protect the system is to keep the freezer near 0°F, replace the water filter, clean the ice bin, and check for blocked tubes or poor door seals. If you understand how does an ice maker in a freezer work, you can solve many basic problems before calling for service.
Check your freezer’s temperature and ice maker settings today. For more practical appliance guides, explore related resources, subscribe for updates, or share your ice maker question in the comments.