
Converting a slow cooker recipe to an Instant Pot is usually simple, but you cannot swap the cooking times one for one. For most U.S. recipes, use the same ingredients, add enough thin liquid to create steam, and pressure-cook the food for about one-third of the slow cooker time. Then adjust for the food type, thickness, and release method.
The safest approach is to use the slow cooker recipe as a flavor guide, not as an exact Instant Pot formula. Pressure cooking changes how liquid moves, how meat tenderizes, and when you should add dairy, pasta, or thickeners.
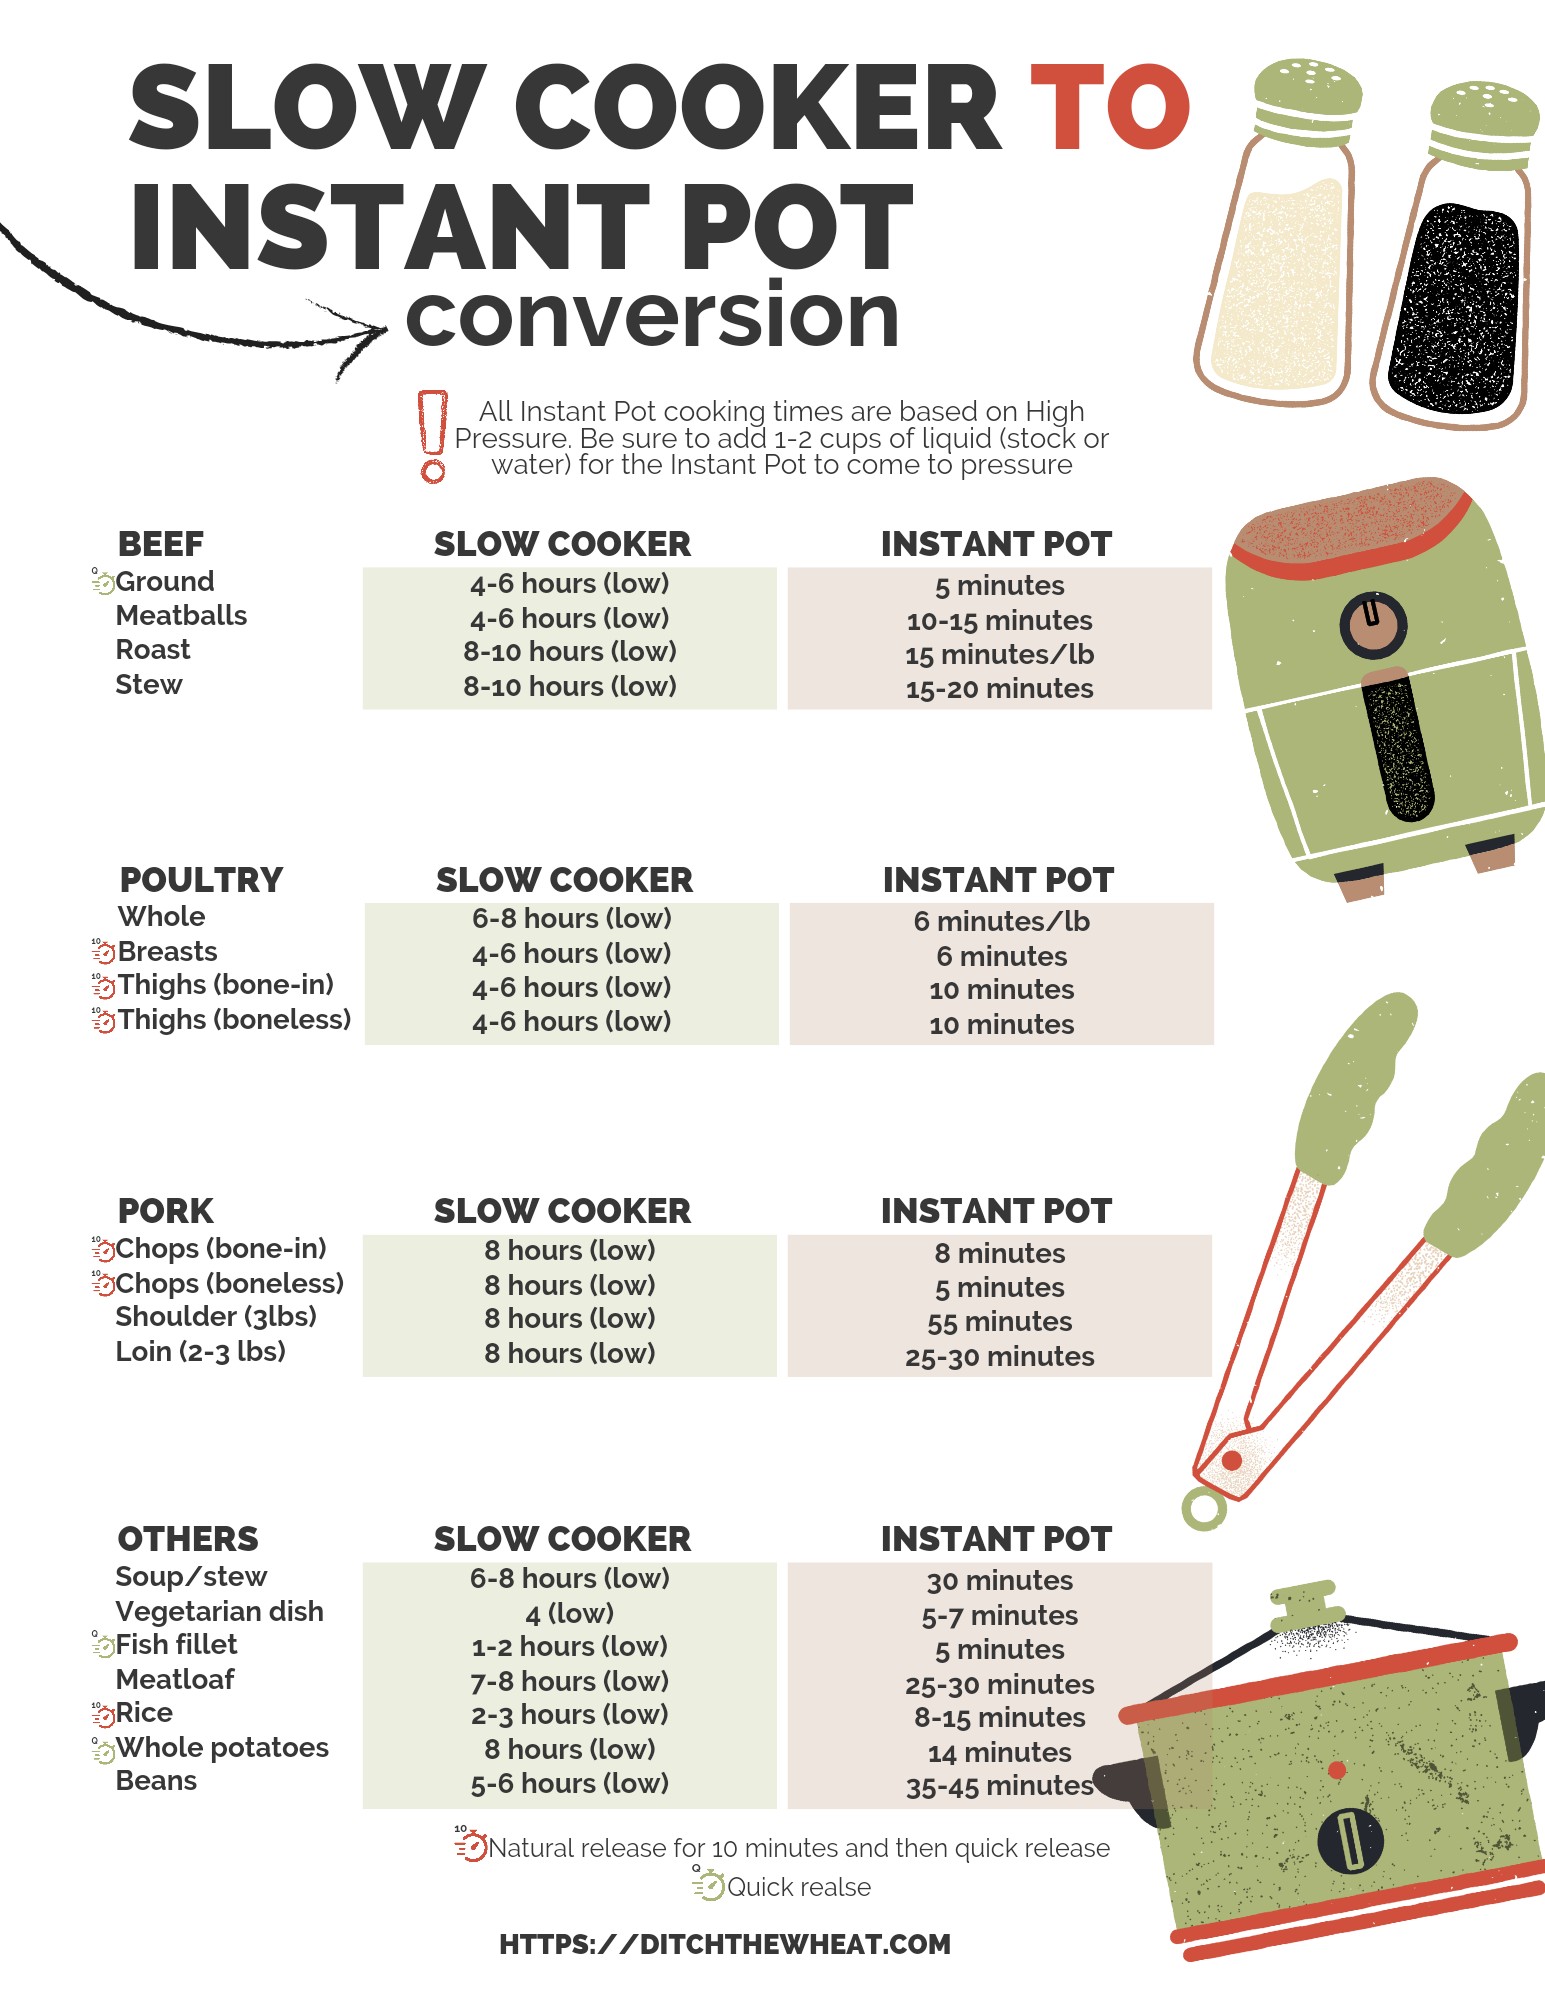
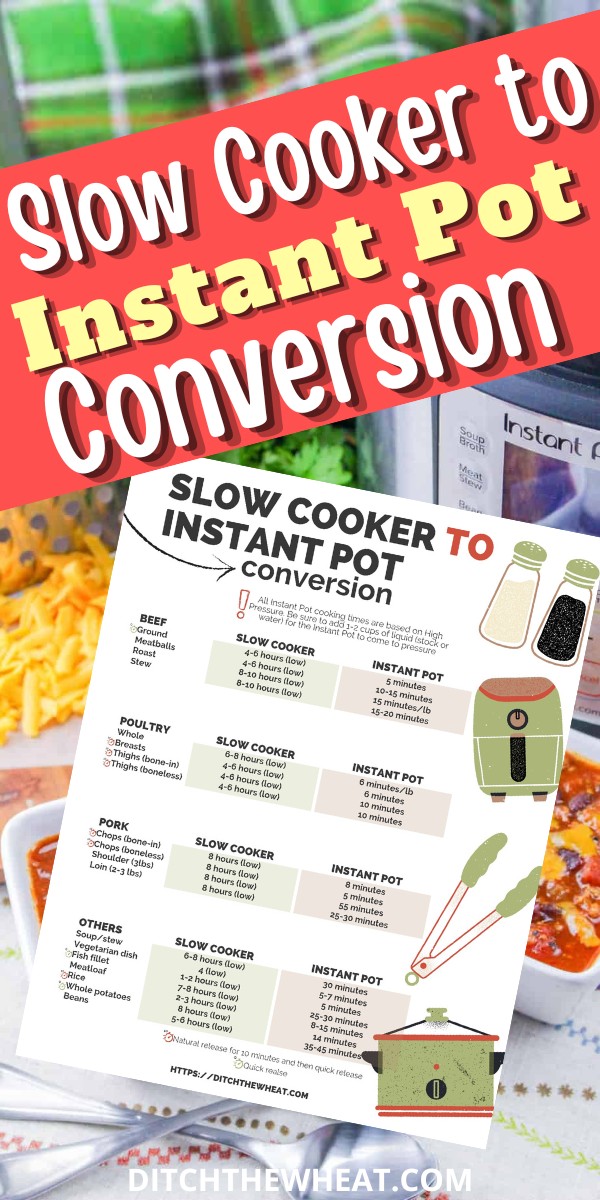
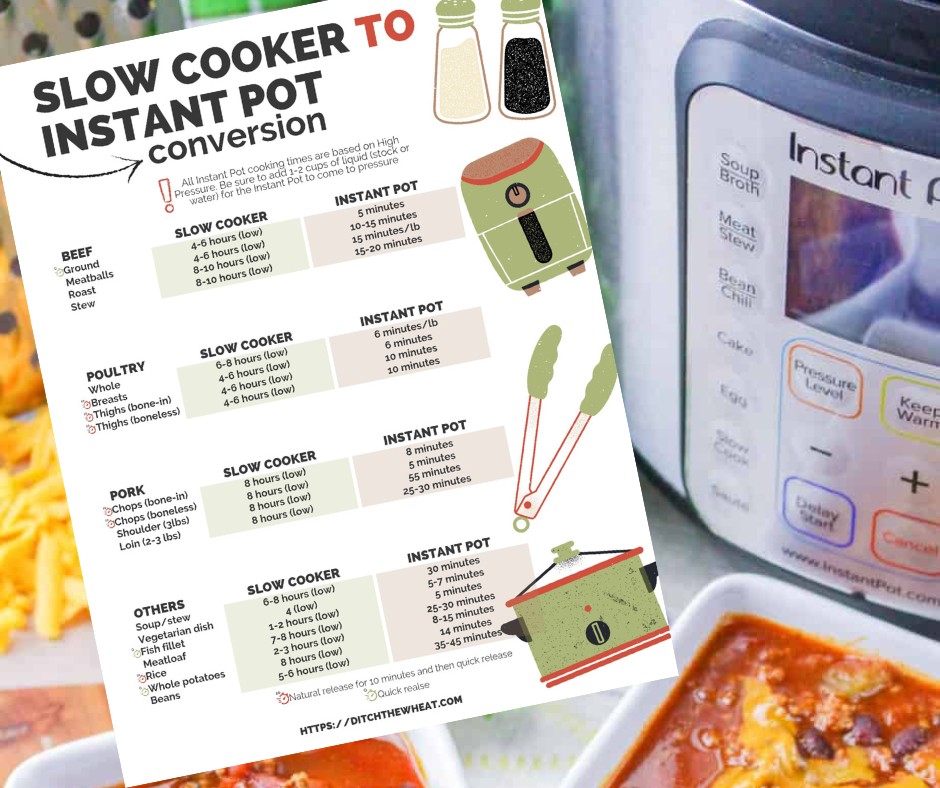
Slow Cooker to Instant Pot Conversion Chart
Use this chart as a starting point, then check the food itself for doneness. The times below refer to the high-pressure cooking time, not the full time needed for the Instant Pot to heat, build pressure, and release pressure.
| Slow cooker recipe time | Suggested Instant Pot pressure-cook time |
|---|---|
| 4 hours on HIGH | 15–20 minutes |
| 6 hours on LOW | 20–25 minutes |
| 8 hours on LOW | 25–35 minutes |
| 10 hours on LOW | 30–40 minutes |
| 12 hours on LOW | 35–45 minutes |
A basic rule is:
Instant Pot cooking time = about one-third of the slow cooker cooking time.
This rule works best for soups, stews, shredded meat, and similar dishes. It is less reliable for large roasts, dried beans, dense vegetables, and recipes with several different ingredients.
Why the conversion is not exact
A slow cooker cooks gently for several hours. An Instant Pot cooks under pressure at a higher temperature, so food softens much faster. However, the Instant Pot also needs time to:
- Heat the liquid.
- Build pressure.
- Cook at pressure.
- Release pressure.
A recipe that takes 30 minutes at high pressure may take 45 to 60 minutes from start to finish. The display timer does not include all of the heat-up time.
A better time estimate
Use this simple formula:
Total Instant Pot time = heat-up time + pressure-cook time + pressure-release time
For example, a beef stew may need:
- 15 minutes to reach pressure
- 30 minutes at high pressure
- 15 minutes of natural release
The total time is about 60 minutes, even though the programmed cooking time is only 30 minutes.

What You Need Before Converting the Recipe
Before you begin, identify the recipe’s main ingredients and cooking method. The best conversion depends on whether you are cooking meat, beans, vegetables, grains, or a thick sauce.
Check these details:
- The cut and size of the meat
- Whether the meat is bone-in or boneless
- Whether beans are dried, soaked, or canned
- The amount and type of liquid
- The size of the vegetables
- Whether the recipe contains dairy, pasta, rice, or flour
- The size and model of your Instant Pot
- Whether the original recipe uses LOW or HIGH on the slow cooker
Use the Instant Pot manual for your exact model. Models can differ in minimum liquid levels, maximum fill lines, pressure settings, and available programs.
Choose the right pressure setting
Most converted slow cooker recipes use High Pressure. High pressure is useful for:
- Beef chuck
- Pork shoulder
- Chicken thighs
- Stews
- Dried beans
- Tough vegetables
- Brothy soups
Use Low Pressure when the recipe contains delicate foods or when you want a softer cooking effect. Low pressure may help with fish, some vegetables, and certain desserts, but the cooking time will usually be longer.
Cut food into similar sizes
Cut vegetables and meat into pieces that are close in size. Small pieces cook faster than large ones. If you combine small potatoes with a large roast, the potatoes may become soft long before the meat is tender.
For stew, pieces around 1½ to 2 inches often cook more evenly than very large chunks. This is a practical starting point, not a universal rule for every recipe.

Step-by-Step: How to Convert a Slow Cooker Recipe
1. Keep the main ingredients, but review the liquid
You can usually keep the same meat, vegetables, herbs, spices, and stock. The main change is the liquid.
An Instant Pot needs enough thin liquid to produce steam and maintain pressure. A slow cooker does not depend on steam in the same way, so slow cooker recipes may contain too little liquid for pressure cooking.
Use water, broth, stock, wine, or another thin cooking liquid. Follow your model’s manual for the minimum amount. Many 6-quart electric pressure cookers require roughly 1½ cups of thin liquid, but the exact requirement varies by model and recipe.
Do not count thick ingredients such as:
- Tomato paste
- Barbecue sauce
- Cream cheese
- Flour-based gravy
- Thick salsa
- Peanut butter
These ingredients may not produce enough steam and can settle on the bottom of the pot.
2. Reduce excess liquid when needed
A slow cooker recipe may finish with more liquid than it started with because the food releases juices during cooking. An Instant Pot traps steam, so very little liquid evaporates.
Do not automatically add all the liquid listed in a slow cooker recipe. Add enough thin liquid for pressure cooking, then thicken or reduce the sauce after cooking.
For example, if a slow cooker recipe calls for:
- 2 cups of broth
- 1 cup of tomato sauce
- 1 cup of vegetables
You may not need all 2 cups of broth in the Instant Pot. Use the amount needed for safe pressure cooking, while remembering that tomato sauce can burn if it sits directly on the bottom.
3. Layer the ingredients correctly
Place thin liquid near the bottom of the inner pot. Add meat and firm vegetables next. Put thick sauces on top when possible, and avoid stirring them into the bottom liquid.
A useful layering order is:
- Thin broth or water
- Aromatics such as onion and garlic
- Meat
- Firm vegetables
- Thick sauces or tomato products on top
This arrangement helps reduce the chance of a “Burn” or “Food Burn” message.
4. Brown meat first if the recipe calls for it
Use the Sauté function to brown meat in batches. Browning adds flavor, but it is optional. It does not replace pressure cooking.
After browning, remove stuck bits from the bottom with a small amount of thin liquid. Scrape the pot clean before pressure cooking. Burned food left on the bottom can trigger a burn warning.
5. Set the pressure-cook time
Choose a time based on the main ingredient, not only the slow cooker setting.
As a starting point:
- Chicken breasts: 8–12 minutes, depending on thickness
- Chicken thighs: 10–15 minutes
- Pork shoulder chunks: 25–35 minutes
- Beef stew meat: 25–35 minutes
- Large beef or pork roast: 45–75 minutes
- Dried beans: 25–45 minutes, depending on the bean
- Hard-boiled eggs: use a tested egg method rather than a slow cooker conversion
These are starting ranges. Bone-in meat, frozen food, thick cuts, altitude, and crowded pots can change the result.
6. Select the right release method
Use a natural release when the food contains tough meat, beans, or a large amount of hot liquid. The pressure falls on its own, and the food continues to cook as it rests.
Use a quick release for foods that may become mushy, such as:
- Green vegetables
- Seafood
- Delicate chicken
- Pasta
- Some rice dishes
For many stews and roasts, a 10- to 15-minute natural release followed by a quick release of remaining pressure is a useful middle ground.
Never force the lid open. Wait until the float valve drops and the cooker indicates that pressure has fully released.
7. Add finishing ingredients after pressure cooking
Add these ingredients after pressure cooking unless a tested recipe says otherwise:
- Milk
- Heavy cream
- Sour cream
- Cream cheese
- Shredded cheese
- Cornstarch slurry
- Flour-based thickener
- Fresh herbs
- Pasta that cooks quickly
Turn on Sauté after pressure cooking if you need to reduce the sauce or activate a thickener. Stir often so the sauce does not scorch.
How to Convert Meat-Based Slow Cooker Recipes
Meat is one of the easiest categories to convert, but the cut matters more than the weight alone.
Beef stew and pot roast
Use tough cuts such as chuck roast for pressure cooking. Cut a roast into large pieces if you want a shorter cooking time and more even results.
For beef stew:
- Add at least the required amount of thin liquid.
- Cook at high pressure for about 25–35 minutes.
- Use a natural release for 10–15 minutes.
- Check whether the meat pulls apart easily.
- Cook for another 5–10 minutes if it remains tough.
Tough meat is often undercooked, not overcooked, when it feels chewy. Connective tissue needs more time to break down.
For a whole roast, the cooking time may be closer to 45–75 minutes, followed by a natural release. The exact time depends on the roast’s thickness and desired texture.
Pork shoulder
Pork shoulder converts well because it contains connective tissue and fat. Cut it into several large pieces for faster cooking.
A practical starting point is:
- 25–35 minutes at high pressure for chunks
- 45–60 minutes for a larger piece
- Natural release for at least 10 minutes
For pulled pork, the meat should shred easily with a fork. If it resists, return it to pressure for another 5–10 minutes.
Chicken
Chicken cooks much faster in an Instant Pot than in a slow cooker. Avoid using the slow cooker time directly.
Approximate starting points include:
- Boneless chicken breasts: 8–12 minutes
- Bone-in chicken breasts: 10–15 minutes
- Boneless chicken thighs: 10–12 minutes
- Bone-in chicken thighs: 12–15 minutes
The thickness of the chicken matters more than its weight. Check the thickest part with a food thermometer. The U.S. Department of Agriculture recommends cooking poultry to 165°F measured in the thickest part.
Use quick release for lean chicken if you want to reduce additional cooking. A short natural release can help larger pieces stay moist.
Ground meat
Brown ground beef, turkey, or pork first when possible. Pressure cooking ground meat without browning can produce a soft, compact texture.
For chili, meat sauce, or taco filling:
- Brown the meat using Sauté.
- Drain excess fat if needed.
- Deglaze the pot.
- Add thin liquid.
- Add thick tomato products on top.
- Pressure-cook for about 10–20 minutes.
- Stir and adjust the sauce after cooking.

How to Convert Slow Cooker Soups, Stews, and Chili
Soups and stews usually convert well, but thick recipes need special care. The Instant Pot cannot safely build pressure if the contents are too thick or too dry.
Soups
Keep the same basic ingredients, but add enough broth or water for pressure cooking. Do not fill the inner pot above the marked maximum line. For foods that expand, such as beans, rice, or pasta, leave extra space.
Add quick-cooking ingredients later when possible. For example, add spinach, peas, or small pasta after pressure cooking and use the residual heat to finish them.
Stews
For a stew:
- Add thin liquid first.
- Add meat and firm vegetables.
- Place tomato paste or thick sauce on top.
- Do not stir thick ingredients into the bottom.
- Cook at high pressure for about one-third of the slow cooker time.
- Use natural release for better meat texture.
- Thicken the sauce at the end.
If the vegetables are soft but the meat is tough, remove the vegetables and pressure-cook the meat longer. This prevents the vegetables from turning to mush.
Chili
Chili can trigger a burn warning because beans, tomato products, and ground meat create a thick mixture. Brown the meat first, deglaze the pot, and place tomato products near the top.
Use enough broth or water for pressure cooking. Add a cornstarch slurry or masa harina after cooking if you want a thicker chili.
Canned beans need only to heat through. Dried beans require their own cooking time and may not finish at the same time as meat or vegetables.
How to Convert Beans, Rice, Pasta, and Vegetables
Not every slow cooker ingredient should go into the Instant Pot at the same time. Different foods absorb liquid and soften at different rates.
Dried beans
Dried beans can expand significantly. Sort and rinse them first. Do not fill the pot more than halfway when cooking beans, grains, or other foods that foam and expand.
Cooking time varies by bean:
- Black beans: often about 25–35 minutes
- Pinto beans: often about 25–40 minutes
- Kidney beans: often about 30–40 minutes
- Chickpeas: often about 35–50 minutes
These are broad starting ranges. Bean age, soaking, water hardness, and altitude can affect cooking. Follow a tested recipe when possible.
Some kidney bean guidance requires boiling the beans before pressure cooking because improperly prepared kidney beans can contain high levels of phytohaemagglutinin. Do not rely on a short pressure-cook time alone for raw kidney beans.
Rice
Rice needs a measured liquid ratio. Do not simply add the liquid from a slow cooker rice recipe.
White rice, brown rice, wild rice, and risotto all need different methods. Use a tested Instant Pot rice recipe for the exact variety. Rinsing rice can also affect texture and starch.
Pasta
Pasta can become soft quickly under pressure. Add it near the end when possible, or use a tested one-pot pasta recipe.
If you pressure-cook pasta:
- Use enough liquid for the pasta to absorb.
- Break long pasta so it fits below the liquid.
- Avoid stirring thick tomato sauce directly on the bottom.
- Use a short cooking time.
- Release pressure carefully because foamy liquid can spray from the valve.
Vegetables
Firm vegetables such as potatoes, carrots, and winter squash can cook with meat. Delicate vegetables such as peas, spinach, zucchini, and broccoli often work better when added after pressure cooking.
Cut firm vegetables into larger pieces if the meat needs a long cooking time. Otherwise, they may become overly soft.

How to Adjust Seasonings and Sauces
Pressure cooking preserves liquid, so flavors can taste stronger or more concentrated. Start with the recipe’s seasoning, but plan to taste and adjust after cooking.
Add these ingredients at the end when you want fresher flavor:
- Salt
- Lemon juice
- Vinegar
- Fresh herbs
- Hot sauce
- Grated cheese
- Cream
- Soy sauce
Be cautious with salt in recipes that use salty broth, canned soup, soy sauce, bacon, or cured meat.
Thickening the sauce
Do not add flour or cornstarch before pressure cooking unless the recipe has been specifically tested. Thick sauces can interfere with steam production and cause food to burn.
After cooking, use one of these methods:
Cornstarch slurry: Mix equal parts cornstarch and cold water. Stir it into the hot liquid, then simmer until thick.
Flour slurry: Mix flour with cold water before adding it. Simmer the sauce long enough to remove the raw flour taste.
Reduction: Use Sauté to simmer the liquid until it reaches the desired thickness.
Natural thickeners: Mashed potatoes, puréed vegetables, beans, or a small amount of instant potato flakes can thicken some dishes.
Common Conversion Mistakes and How to Fix Them
Mistake 1: Using the slow cooker time directly
Cooking for 8 hours in an Instant Pot is usually unnecessary and can make meat dry or vegetables mushy.
Fix: Start with about one-third of the slow cooker time, then adjust based on the food.
Mistake 2: Adding too little liquid
The cooker may fail to reach pressure or may display a burn warning.
Fix: Add the minimum amount of thin liquid required by your model. Avoid counting thick sauces as cooking liquid.
Mistake 3: Stirring tomato sauce into the bottom
Tomato products and thick sauces can stick and burn.
Fix: Add broth first, scrape the pot clean, and place thick ingredients on top.
Mistake 4: Adding dairy before pressure cooking
Milk and cream can curdle or scorch under pressure.
Fix: Add dairy after pressure cooking. Use Sauté on low heat if the sauce needs to simmer.
Mistake 5: Filling the pot too high
Overfilling can block the pressure-release system and create a safety risk.
Fix: Stay below the maximum-fill line. For beans, rice, and foods that foam or expand, use a lower fill limit from the manufacturer’s instructions.
Mistake 6: Releasing pressure too quickly
A quick release can make meat less tender and may cause hot liquid or foam to spray from the valve.
Fix: Use a natural release for beans, stews, and large cuts of meat. Keep your hands and face away from the steam.
Mistake 7: Assuming “tough” means overcooked
Beef, pork, and lamb can remain chewy when they need more time to break down.
Fix: Check the meat. If it is firm and does not pull apart, pressure-cook it for another 5–10 minutes.
Mistake 8: Expecting the same amount of finished sauce
Slow cookers allow more evaporation. Instant Pots retain most of the liquid.
Fix: Reduce the sauce after cooking with the Sauté function.

When You Should Not Convert a Slow Cooker Recipe Directly
Some recipes need a different method rather than a simple time conversion.
Use caution with:
- Recipes that rely on evaporation
- Very thick dips
- Large whole cuts with unusual shapes
- Delicate fish
- Recipes with a high amount of dairy
- Cakes and baked goods
- Pasta-heavy casseroles
- Recipes that depend on a crisp crust
- Recipes with a long uncovered simmer
Pressure cooking cannot reproduce every slow cooker result. It also cannot brown or crisp food during pressure cooking. If a slow cooker recipe finishes with a browned top, transfer the food to an oven-safe dish and broil or bake it after pressure cooking.
For food safety, use a food thermometer for meat and poultry. Time alone does not confirm that food has reached a safe internal temperature.

A Worked Example: Converting Slow Cooker Beef Stew
Imagine a U.S. slow cooker recipe that calls for:
- 2 pounds of beef chuck
- 4 carrots
- 4 potatoes
- 1 onion
- 2 cups of beef broth
- Tomato paste
- Herbs
- 8 hours on LOW
A reasonable Instant Pot plan would be:
- Cut the beef into 1½- to 2-inch pieces.
- Use Sauté to brown the beef in batches.
- Remove the beef and deglaze the pot with some broth.
- Add the remaining thin broth.
- Return the beef and add the onion and herbs.
- Place tomato paste on top rather than stirring it into the bottom.
- Add the carrots and potatoes in large pieces.
- Cook at high pressure for about 30 minutes.
- Allow a natural release for 10–15 minutes.
- Check the beef and vegetables.
- Thicken the liquid after cooking if needed.
If the beef is still chewy, pressure-cook it again for 5–10 minutes. If the vegetables are already tender, remove them before the second cooking cycle.
This example shows why the conversion is more than a time change. The liquid, layering, release method, and ingredient size all affect the final dish.

Signs the Conversion Worked
Your converted recipe is likely successful when:
- The Instant Pot reached and maintained pressure.
- The meat reaches a safe internal temperature.
- Tough meat pulls apart or cuts easily.
- Vegetables are tender but still hold their shape.
- The sauce has the intended flavor after final seasoning.
- No burn warning appears.
- The liquid is thickened only after pressure cooking, when appropriate.
If the result is too watery, use Sauté to reduce it or add a slurry. If it is too dry, stir in hot broth a little at a time. If the meat is tough, cook it longer rather than raising the temperature.
Instant Pot Safety Rules
Follow the manufacturer’s manual for your specific model. General safety rules include:
- Inspect the sealing ring before use.
- Make sure the steam-release valve is in the correct position.
- Never force the lid open.
- Keep your face and hands away from escaping steam.
- Do not overfill the inner pot.
- Use the manufacturer’s lower fill limit for expanding foods.
- Clean the sealing ring, lid, and steam valve after cooking.
- Do not use a damaged sealing ring or lid.
- Use caution with foamy foods such as beans, pasta, and grains.
The USDA recommends keeping food out of the temperature danger zone and using safe internal temperatures for meat and poultry. Pressure cooking is not a substitute for checking doneness.
Frequently Asked Questions
Can I convert any slow cooker recipe to an Instant Pot?
No. Most soups, stews, braises, beans, and shredded meats convert well. Recipes that depend on evaporation, browning, crisping, or delicate texture may need major changes.
Is the Instant Pot cooking time one-third of the slow cooker time?
About one-third is a useful starting point, not a fixed rule. Meat thickness, bone-in cuts, food density, liquid level, and pressure release all affect the result.
Do I need to add more liquid to a slow cooker recipe?
Often, yes. An Instant Pot needs enough thin liquid to create steam and maintain pressure. Check the manual for your model, and do not treat thick sauces as a substitute for broth or water.
Should I use quick release or natural release?
Use natural release for beans, large cuts of meat, and many stews. Use quick release for delicate foods that may overcook. A partial natural release often works well for meat-based dishes.
Can I add cream or milk before pressure cooking?
It is usually better to add dairy after pressure cooking. Milk and cream can scorch or curdle, especially in thick mixtures.
What should I do if the Instant Pot says “Burn”?
Cancel the program and release pressure safely. Remove the food, inspect the bottom, and scrape away stuck food. Add more thin liquid, avoid stirring thick tomato products into the bottom, and restart only if the food is not burned.
Can I convert a slow cooker recipe with frozen meat?
Frozen meat may require a different pressure-cooking time and may cook unevenly if it is frozen in a large block. Follow a tested recipe for the specific cut, and verify the thickest part with a food thermometer.
Key Takeaways
- Start with about one-third of the slow cooker cooking time.
- Count heat-up and pressure-release time when planning dinner.
- Add enough thin liquid for your Instant Pot model.
- Put thick sauces and tomato products on top.
- Add dairy and most thickeners after pressure cooking.
- Use natural release for beans, stews, and large cuts of meat.
- Check meat with a food thermometer.
- Cook longer if tough meat has not become tender.
- Reduce excess liquid with the Sauté function.
Conclusion
To convert a slow cooker recipe to an Instant Pot, keep the core ingredients but change the timing, liquid, layering, and release method. Begin with roughly one-third of the slow cooker time, use the minimum thin liquid required by your model, and add thick or delicate ingredients at the right stage.
For your first attempt, choose a forgiving dish such as beef stew, pulled pork, chicken thighs, or soup. Record the pressure time, release method, and final texture. That small note will make the next conversion much more accurate.